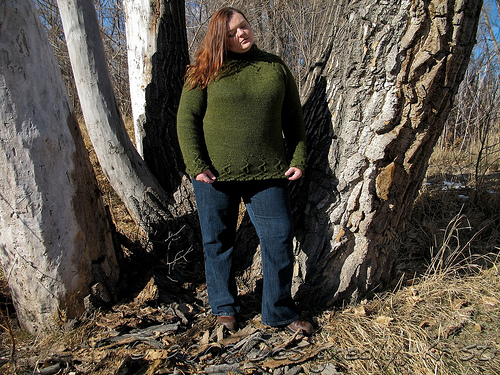
Fiber Fool

Follow the feats and foibles of a fiber fanatic.

Final FO of 2008!

Filed under: Knitting, Finished Objects, Apparel — Kristi at 3:44 am on Wednesday, December 31, 2008

Wisteria In The Park

Pattern: Wisteria
Designer: Kate Gilbert
Source: Twist Collective, Fall 2008
Yarn: Brown Sheep Prairie Silks in Jeweled Moss (18 3/4 skeins ~1655 yds)
Needles: US8 Turbo
Size: 51″ (w/ mods)
Completion Date: December 23rd, 10pm (nothing like cutting it close, LOL!)
Modifications: Many, keep reading for details.

Wisteria in the Park
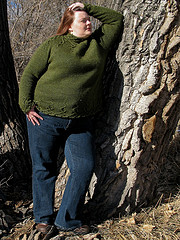
I previously wrote about wanting to put in short rows. I opted to start them at 1 inch below the armholes with the shortest short rows and progress to longer ones. I worked 5 pairs which added ~ 1.75 inches (the average of the various sources and measurements I saw on figuring out how much to put in). I was going to show you a picture with lifelines marking the short rows, but the sweater, light and camera never came together. Perhaps on the next sweater. But, that did put the shortest of the short rows at the crest of my bust which was what I was aiming for. I am quite happy with the addition of the short rows and this was a great pattern for doing so since the center section was all stockinette stitch.

Originally, short rows were the only mod I was going to make. But as I knit on the sweater and looked more and more at the schematic the more I realized that it was going to become a dress on me and that the “waist” would hit at my high hip. I was also worried that it could be even worse if my washed and blocked gauge swatch lied to me as we all know they can do. So, once I finished the short rows I immediately set about recalculating all the shaping of the torso area. The result was to raise the waist by ~1.5 inches (I’m quite short waisted - like my hip bones nearly touch my lowest ribs short waisted - no lie). Then I decided since I was making mods I should take a closer look at the hip area. There was a leap of two chart repeats between the second largest and largest size at the bottom of the sweater. I decided to split the difference and work 18 charts around the bottom rather than the 17 stated for my size. In retrospect, I probably could have skipped that mod, but it isn’t bad as it is either. Doing that also changed my shaping in the mid section.

Wisteria in the Park
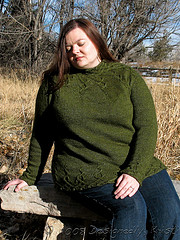
As I was knitting the bottom chart I realized that if I completed the chart it was still going to be a bit long, so I cut out a vertical repeat. This had the added benefit of lightening the hip area which was a good thing for my shape. I prefer it to leaving the cabling out all together as some people have done. To me what really made the pattern was the repetition of the organic looking cables. I did the same to the sleeves which I’m glad I did as they would have also been too long even though I started the sleeve chart as soon as I was at the proper stitch count. And while I normally would consider the sleeves as they are to be too long they aren’t. They are nice and fitted so they stay put and don’t seem to get in the way at all.

Wisteria Yoke Detail
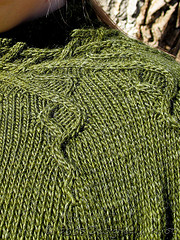
The yarn worked quite well. Despite it being a singles yarn with mohair the stitch definition of the cables is great. I matched stitch and row gauge right off the bat. The 88-yd skeins were somewhat annoying, especially when 4 of the 19 hanks I broke into had knots in them too. The yarn is not next to the skin soft. I do have to wear a turtleneck underneath which isn’t really required as the sweater itself is quite warm. But that mohair in there just gets annoying after too long. But overall the final sweater is great and I am sure will get plenty of wear even with a turtleneck underneath since I tend to run cold in the winter.

I loved knitting this pattern. I loved that it is visually interesting (and the knitting of it was interesting too) yet still allowed for lots of modifications to make it fit my body and its idiosyncrasies. I am no longer scared about making modifications to patterns so that they fit well. As I told my mom, “It looks as though someone knit it just to fit me!” :-) Just what I was aiming for! Nothing is more flattering than a good fit! All-in-all, not a bad FO for ringing out the old year! And, I now can dream about my first sweater of 2009, LOL! What will it be?

Happy Holidays!

Filed under: Photography — Kristi at 11:12 am on Tuesday, December 23, 2008

Red Pearl Amaryllis - Top View

Just popping in to wish you all a wonderful holiday season and share some of the beauty around our house right now. For those traveling, please be safe. I’ll be back in the new year (perhaps earlier, we’ll see).

Red Pearl Amaryllis Red Pearl Amaryllis

Red Pearl Amaryllis

FO Friday: Felted Notebook/Journal Cover

Filed under: Bookbinding, Finished Objects, Felting — Kristi at 3:48 am on Friday, December 19, 2008

Felted Notebook Cover

‘Tis the season for last minute and inexpensive gifts! This past Sunday one of my knitting groups hat a holiday gathering at the mountain home of one of the founding members. We were asked to bring a handmade gift with materials adding up to $10 or less. We did not *have* to make the gift, though that of course was highly encouraged. We drew numbers and each person could steal an already open gift or open a wrapped gift. Each gift could only be stolen twice. After that it was at its permanent home.

Felted Notebook Cover - Button DetailMy plan was to make a handbound knitting journal with a hand felted cover. Nothing was going quite right in terms of the handbound book and was working on it at the very last minute (of course), so I went with plan B and bought a blank journal at the bookstore. Despite the store bought journal it was one of the gifts to get stolen the maximum number of times.

The cover used dyed corriedale roving in several different colors which I hand felted using bubble wrap to aid in the agitation. Because it wasn’t a large piece I skipped the stabilizing sheer fabric. Once the felt was dry I wrapped it around the journal, folding the front edge to form a pocket that hooked on the front cover of the book. I used needle felting to close the pocket seamlessly and also to attach a length of handspun mohair yarn for the closure. Three different buttons before sewing them to the cover to wrap the yarn around. I chose to not make a back pocket because the edges of handmade felt are so interesting.

Felted Notebook Cover - Open

It was a really economical project in both time and funds and is one of my favorite things I’ve made this year. Go figure! LOL!

The Non-Traditional Spread Spectrum

Filed under: Knitting, Socks, Knitting Patterns, Designing — Kristi at 11:25 am on Thursday, December 18, 2008

© Interweave Press, used with permission - Spread Spectrum socks from Knitting Socks with Handpainted Yarn

© Interweave Press, used with permission

Spread Spectrum is the quickest and simplest (at least in the actual knitting, though some may argue about the construction) of my three patterns in Knitting Socks with Handpainted Yarns.

Spread Spectrum SwatchWhat was the inspiration behind this design? All those skeins of handpaint yarn I have scattered around the house that are just too pretty as they are to actually be knit. Come on, fess up! I know you have them. Spread Spectrum is a pattern that really lets the yarn take center stage and show off the artistry from all the talented independent dyers.

Have you ever noticed how different handpaint looks when it is in a hank where you can see how the dye was applied to the skein? Remember how drastically different it looks after you’ve wound it into a ball and all the colors have mixed? That was what spurred me to knit the leg of this pattern in intarsia strips of varying widths. Changing the stitch count by as little as 2 stitches can make a huge difference in how the different colors lie and interact with each other.

Spread SpectrumThis pattern will work best with yarns that have long-ish sections of color that will pool or diagonally stripe when knit traditionally. The fewer the colors and higher the contrast between those colors the more the construction of the sock will stand out. The Blarney Stone colorway of Socks That Rock used for the book was dyed in a palindrome (A-B-C-C-B-A color sequence) fashion. If the yarn you are using is dyed linearly (A-B-C-A-B-C), alternate the direction of your yarn butterflies for each intarsia strip and you’ll have a higher energy look to the leg of your socks. You could even dig out all those self-patterning yarns that you’ve grown tired of and put them into this pattern for a completely different look.

Original Spread Spectrum - Cuff DetailBecause of the non-traditional construction of this sock it is important to pay attention to the note on sizing. Gauge is critical here because stockinette stitch is not nearly as stretchy vertically as it is horizontally. That means for the best fit you need to match your foot circumference as closely as possible to the sock’s circumference and this is done by your row gauge. That makes row gauge of more importance that in most sock patterns. For a snug fit you’ll want to knit the foot 10-15% shorter than your actual foot length. The foot length of the sock is determined mostly by your stitch gauge (the heel and toe are knit normally so row gauge makes a difference in how much those contribute to the length of the foot).

See more of my design work on Ravelry or in my Fiber Arts Store. Don’t forget, today (Thursday, Devember 18th) is the last day to get Guided By Love! After that, the pattern is officially retired!

The Fun and Flirty Longbourn Socks

Filed under: Socks, Knitting Patterns, Designing — Kristi at 2:26 pm on Tuesday, December 16, 2008

© Interweave Press, used with permission. Image of the Longbourn socks from Knitting Socks with Handpainted Yarns by Carol Sulcoski.

© Interweave Press, used with permission.

The Longbourn socks (Ravelry) I have to confess are my favorite of the three patterns I contributed to Knitting Socks with Handpainted Yarns. A few months prior to the call for submission proposals I had spent a long day huddled in my basement with DH watching the 5 hours of the BBC mini-series Pride and Prejudice. On this 100th viewing (at the very least I’m sure) of the show the lines of the wallpaper in the Bennet’s dining room at Longbourn really struck a chord with me. They kept popping up in my head over and over again and I kept trying to think of ways to use it in something.

Around that same time a lot of the design work I was doing was for various socks clubs. So far in designing for sock clubs I have never had the option of working colorwork socks, yet I knew colorwork with some embroidery was going to be the most faithful interpretation of the wallpaper in handknit fabric. So, I furiously knit a mini-sock to test out my theory.

Longbourn SwatchThe mini version used an analogous colorway (all colors are neighbors on the colorwheel) of Schaefer Anne handpainted yarn for the main design elements. Since those colors were all warm yellows and oranges I decided to use its complementary color for the background to maximize the contrast - a deep, rich navy semi-solid Shepherd Sock from Lorna’s Laces. It was love at first sight :-) Both Lorna’s and Anne are on the fine end of fingering weight sock yarns and I felt that lent an air of adult refinement to what might otherwise be considered a young girl’s pattern with all those lazy daisies.

Some of you may look at the socks and only see tons of embroidery in your future if you chose to knit these. Let me confess to you that I *loathe* embroidery. I will do it if it is the best means to an end, but I’ll grumble about it the whole time. I certainly do not purposefully seek out opportunities to embellish in such a way. Oddly, it wasn’t a horrible task (though I really drug my feet and knit these socks last). What worked for me was to stitch one round of lazy daisies every time I had a knit enough to fit them on (roughly at each half of a vertical repeat). This kept it from being a monumental finishing task when all the knitting was complete and gave me more room to maneuver the needle while stitching the lazy daisies. With the foot on there and complete it can become a bit of trick to do all that stitching. I highly recommend stitching the flowers as you go!

Longbourn Socks - DetailAnother option for those loath to embroider? Minimized it - just embroider the top level below the picot cuff on each sock. Or, how about a vertical line of them on the outside of each leg or up the back of the leg? Then you could then knit either the instep version of the pattern for the rest of the leg or do the colorwork as originally laid out.

The range of looks for this sock are broad. Even the slightest changes in gauge can greatly influence the feel of the final socks. Heavier yarns will enhance the youthfulness of the sock and lighter yarns will make it look more refined. The color combinations you choose will also greatly impact the feel of the socks. Use two semi-solid yarns to tame the design slightly. Using less contrast (value and/or temperature) between the background and the flowers will have a similar effect, as will using a very dark background color such as the navy in my original mini version. Or find handpainted yarns in Regency era colors to match the pattern with its inspiration! The combinations are nearly endless. You could even use a different color for the lazy daisies than you use for the colorwork if you’ve got some partial skeins lying around in your stash.

Longbourn Socks

I am anxious to knit myself a pair, but I can’t quite settle on colors :-) I’m pretty partial to the original swatch. Then again, I think a dusty sage green with a blue-lavender-periwinkle colorway or just a semi-solid mauve for the flowers would look great. Or, how about a natural cream background and shades of red and burgundy for the flowers? Perfect for Christmas and Valentine’s Day or just to brighten your day in the darker winter months. A nice daffodil yellow for the flowers would have you looking forward to spring each time you slipped them on your feet. Oh, the choices! What yarn and color combos would you knit these socks in?

See more of my design work on Ravelry or in my Fiber Arts Store. Don’t forget, Thursday is the last day to get Guided By Love! After that, the pattern is officially retired!

Next Page »