Fiber Fool

Follow the feats and foibles of a fiber fanatic.

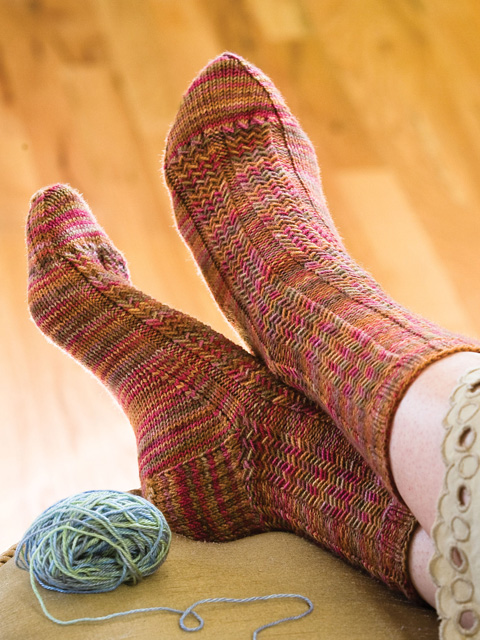
Herringbone Rib Socks And Their Inspiration

Filed under: Knitting, Socks, Knitting Patterns, Designing — Kristi at 6:27 pm on Monday, December 15, 2008

© Interweave Press, Herringbone Rib Socks from Knitting Socks with Handpainted Yarns, used with permission.

Above Photo © Interweave Press, used with permission

I know many of you have seen the Herringbone Rib Socks from Knitting Socks with Handpainted Yarn already as it was excerpted in the most recent issue of Interweave Knits. Thanks to those of you who recognized my name and sent congratulations already! After nearly a year since I sent off my three pattern proposals the book is officially out! It was in stock at Amazon last Thursday and should be popping up in LYSs and bookstores any day now.

In celebration of the release I thought I’d share a bit of insight into my inspiration for my three patterns that are in the book and my thoughts on yarns that would suit them this week. Keep in mind, I’m not a professional dyer like Carol, the book’s author, and I haven’t seen the book yet so I don’t know exactly what Carol has said about the yarns that suit the patterns. These are just my take on the patterns when I came up with the idea and proposed them to Carol and the books staff at Interweave.

Having come to knitting and spinning via mixed media and paper arts, texture and color are major inspirations to me. I love that knitting can evoke so many different textures and even emulate other types of fabrics.

Herringbone Rib Socks - Closer LookI adore the various stitch patterns that look like woven fabric. Often such stitch patterns manipulate the stitches so much that the fabric looses much of the elasticity that it is recommended the pattern be knit on needles two or more sizes larger than you would normally knit a given yarn with. This of course can be done if you knit the stitch pattern in only the cuff, or if you knit your socks on 2-circs and can use the normal size needle for the sole and the large sized one for the instep and leg. Instead, this stitch pattern uses yarn overs to loosen up this woven-look stitch pattern so it can be knit on regularly sized needles.

My love of color has me unable to resist the wonderfully colorful handpainted yarns out there. I do loath pooling/flashing and certain types of diagonaly striping as well which always makes the handpainted yarns a bit of challenge to actually knit with. So when I was first asked to submit some proposals of projects for this book I bounced around a lot of ideas in my head and made many a swatch. Some of my favorite socks knit with handpainted yarns had stitches manipulated in different directions to mix the colors visually. Combine that with a weave-look stitch pattern and I arrived at the Herringbone Ribs pattern.

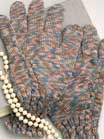
My swatch for the proposal used a yarn that had a definite primary color and was then speckled with short burst of other colors. This year I knit a sock with a very manly colorway of Misti Alpaca’s Hand Paint Sock Yarn (12 Shadow) which has a similar color approach as that used in my proposal swatch. In fact, I have a skein of that yarn in a different colorway earmarked in my stash for my own pair of Herringbone Rib Socks :-)

The Claudia’s Handpaint that was used in the book worked well. It is a lower value contrast colorway so it produced an overall sock that looked almost semi-solid even though the yarn actually has several distinct colors in it. When it comes to this stitch pattern I think you can hardly go wrong. Even if the colors stripe diagonally, the fact that you are pulling a stitch from a previous round over stitches in the current round helps to smudge and soften those lines. I am itching to swatch it up in a yarn with many colors (8 or more) in very short bursts - something like some of the Koigu colorways perhaps?

There are already many pictures popping up on Ravelry of these socks in progress knit with many different brands of handpainted yarns. There are even a speed demon or two who are done already. It is a blast to see what everyone is using. Go check it out!

Special thanks goes out to Kristi Geraci, 1/2 of the Knitter’s Anonymous blog who knit these socks for the book. There was no way I could knit so many socks and get patterns written up in the time allotted from project acceptance to due date without some help. She posted about her experience on her blog just before Thanksgiving.

I Lost My Mind Late Last Week - Have You Seen It?

Filed under: Knitting, Apparel — Kristi at 6:38 pm on Thursday, December 11, 2008

Everything that needs out the door before Christmas is out the door. I have nothing big on the horizon, but I have a ton of outstanding proposals. Despite the fact that my mom has requested her own pair of Guided By Love (only 28 more sales to reach $1500 and 1 week to do it in) and a Mitered Diamond Bag (which I know she won’t use until I engineer a lining with many distinctive pockets) I decided to pick back up Wisteria. I lost my mind when I decided it would make a fantastic Christmas sweater and that I should finish it before then so I can wear it on Christmas day.

I cast it on almost as soon as my February Lady Sweater was off the needles. But after only a day or two some yarn for designs with deadlines arrived and I needed to set it aside. I picked it back up about a week ago now I think. I knit the entire second chart and up to 1 inch after the armholes since then. Not too bad considering how large those later yoke rows were! 300+ sts!

I did have a sizing conundrum. I land smack dab between the two largest sizes. The second largest is a tad scant on ease for a sweater of this style, but the largest would look like a paper sack on me. So, I opted for the second largest size and I’m going to add some short-row shaping in the bust area to give me just a tad more wiggle room. One problem with that is there is little info out there about putting in short-row shaping into a top-down sweater. Some say you do it at the same spot and knit it normally with the longest of the short-rows first and others say you knit the short rows in reverse with the shorter short rows first. I’m thinking the optimum placement of the short rows has the shortest of the short rows at the maximum chest circumference. So I’m going to start my short rows at my apex and knit them with the shortest short rows first and pick up the previous wrap on my way to the next stitch that needs wrapped.

I’m also struggling with how deep to make my short rows. I’m C cup, so consulting some locations I should do ~1-1.5 inch depth. But if I follow the measuring scheme at Knotions I need 2 inches and if I follow the instructions in Big Girl Knits I need 2.5 inches! Righetti says to not exceed 2 inches (even for big busts). Certainly a C cup is ample, but not a *big* bust. I’m thinking the average of 1.75 inches?? Anyone care to ring in with their experience? I seem to be mostly surrounded by small chested knitters or those who don’t knit sweaters or haven’t attempted to modify patterns.

This being my first time putting short rows into a top-down sweater I’m not going to be a fool. I have put in a life line so I can easily rip it out and redo should I decide it is needed. Since I was running a line anyway, I also decided it was time to try on the yoke. I couldn’t resist. It also allowed me to double check that I’m at the right point to start the short rows (and I am, at least for where I think it should start). I learned something else when I put it on - I should have opted to go for the short neck modification. But everyone was going on about how it wasn’t that high of a neck so I did it as written. It’ll certainly be a nice warm sweater with the higher neck and I’m always in need of warmer sweaters. I’m always cold in the winter and that exacerbates some of my health issues and it is amazing what a difference a neck warmer makes. So I’ll just chalk it up to being better for my health to have the higher neck on my sweater :-)

Time to go make the first (and I hope only) stab at my short rows while taking in some holiday movie viewing!

FO: Aran Isle Christmas Slippers

Filed under: Knitting, Finished Objects — Kristi at 6:45 pm on Tuesday, December 9, 2008

Yes, it is gift knitting time. Yes, this pattern came from the 2008 Gift issue of Interweave Knits. No, I didn’t knit these slippers for someone else. Yes, I’m selfish. Sue me!

Last year for Christmas SIL2 gave me yarn that she brought back from her honeymoon. One of the best gifts she’s given me in the 6 years I’ve been married to her brother. I had a problem though. This yarn was very itchy rustic and there was a good quantity of it (350 yds). There was enough to do a hat/scarf/mitten set, but I knew I’d never wear it because it wasn’t soft enough for next to the skin wear. I had hopes it would soften after washing, but I am glad I didn’t count on that :-) Anyway, since SIL2 did such a good job last year I thought I should reinforce the good behavior and have something to show off made from the yarn she gave me. Suddenly it hit me - Aran Isle Slippers! Knit from a rustic aran weight (heavy worsted - verging on bulky) yarn on US 6s and they should last a good long while and I almost always wear slippers over socks so no need to worry about the scratch factor! Score!

Pattern: Aran Isle Slippers (Rav link)
Designer: Jennifer Lang
Source: Interweave Knits Holiday 2008 Special Issue
Yarn: Kerry Woolen Mill’s Aran Wool, Blue Fleck, 100% Wool, 350 yds/200 gm
Size: Women’s (sorta)
Needles: Eight US6 DPNs
Days to Complete: ~4, I found the rustic yarn and tight guage for its weight was a tad stressful on my hands so I had to pace myself. Otherwise it could have been done in a day.
Made For: Me :-)

Modifications: I made several modifications when I knit this pattern. The biggest one was the size. I wear a US9.5-10 women’s shoe. The women’s size was marked for a US7-8. My gauge was a tad looser than called for and I left it that way rather than go down another needle size to give me a bit of extra room. Then in the sole directions I increased the length. At the two points in the pattern where it tells you to continue until a certain length I split the difference between the women’s and the men’s size and the length of the sole was perfect. Due to my change in gauge I found the numbers of stitches to pick up for the surround matched the women’s numbers perfectly with a pick-up rate of 3 out of 4 stitches along the sides. So, I followed the women’s numbers for both the surround and upper and I came out with a great fit. The seed stitch at the beginning of the upper is perhaps just a *tad* loose. I’d maybe knit that portion of the upper on a smaller needle next time.

The other modification I made was to flip the soles. The left sole became the right and vice versa and I put the stockinette stitch side to the inside of the slipper so I have a princess foot. I know from experience that I don’t care to walk on reverse stockinette stitch at that gauge. I am also planning on attaching some suede to the bottom of each slipper. Since the surrounds and uppers of the slippers were the same for each foot the shaping in the soles was pretty much lost. To ensure I get good placement of my suede pieces I want to wear the slippers for a bit to make them match my foot shape better.

I did the find the pattern was a tad vague. I understand simply giving a note to choose the decrease needed to maintain the stitch pattern. Especially when there are multiple sizes and the one needed on a given decrease round is likely not the same for all three sizes and then you’d likely need to spell out each and every decrease round in the surround. However, the pattern gave no indication of what direction of decrease one should choose where and that could have easily been included. Because it happens in seed stitch there was no looking at the photos to figure it out. For those who are thinking of knitting them or who have become frustrated and for my own reminder should I knit another pair - I knit this pair with the first decrease in the round as a left leaning decrease and the second decrease in a round as a right leaning decrease.

The other change I would likely make if I knit these is again is to work the upper via the strip knitting method (covered well in Domino Knitting by Vivian Hoxbro), though I’d run the seam stitches to the outside as a decorative accent like I did in my Dog Days of Summer socks (Rav link). Why would I do this? The seaming wasn’t troublesome or anything, but in an aran yarn at such a tight gauge the seam ends up being rather hard and prominent and feels odd to my feet that have become pampered with seamless socks :-) I do see that it could be troublesome to pick up those initial stitches for the upper in just the right place. Though if you were to put the central 11 sts at the toe end on a stitch holder and left them live rather than binding them off if it would help.

All in all I’m quite happy with the slippers and look forward to showing them off to all the in-laws this Christmas. I also have enough yarn left over to make I think at least 2 more pairs. Then again, some of it might turn into a jacket for my french press or some other little accessory that doesn’t need to touch bare skin for long periods of time. You just never know!

New Pattern Just in Time for Last Minute Gift Knitting!

Filed under: Knitting, Socks, Knitting Patterns, Designing — Kristi at 3:47 pm on Friday, December 5, 2008

Do you recall the SIP shown at left there that I shared back in October (oh my, I hadn’t realized it was quite that long ago)? Well, that pattern has finally come together - two months later.

The Nave Socks feature the Yummy line of MissBabs yarns. I found the yarn wonderful to work with. It stood up to some tinking and reknitting as often happens as part of the design process and the stitch definition is great while still maintaining a nice soft hand.

I chose a fairly intricate lace pattern for the cuff which then morphs into two simpler and easily memorized patterns as you knit down the leg and instep. It speeds up the knitting as you near the finish line while also making the socks warmer in the foot for those with cold toes like mine :-) Knit in the sport weight Yummy yarn I almost didn’t have enough time to realize I was knitting. That sock was done before I knew it (and I have larger feet). I could totally kick out a few pairs of these in sport weight yarn before gift giving deadlines hit if needed.

The lines of the sock’s three stitch patterns mimic those seen in cathedral naves. The cuff is the ornate clerestory giving way to the arches of the triforium which then becomes the arcade of columns separating the nave from the aisles. The result is a feminine lace sock that balances ornament and function.

The Nave sock pattern has several great features. There are 5 stitch counts and 11 gauges ranging from 5 sts/in to 10 sts/in, making it great for a wide range of sock yarn weights. Two tables make it quick and easy to choose the proper sizing without any complicated math to worry about. For the first time at Designedly, Kristi the written stitch pattern instructions are on one and page and the charted version are on another page. This allows you to be economical and green by just printing the version you prefer to knit from!

So what are you waiting for? Check it out on Ravelry too!

« Previous Page