Fiber Fool

Follow the feats and foibles of a fiber fanatic.

Tutorial: Creating Shanked Buttons from Single, Vertical Hole Beads

Filed under: Tutorials — Kristi at 6:37 pm on Thursday, March 4, 2010

Shanked Buttons Made from Single Vertical Hole Beads

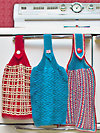
I don’t know about you, but finding just the right button for a project is of utmost importance to me. Often it seems like it can make or break a knitting project. When it comes to needing petite buttons, the choices are quite limited in my little corner of the world. It seems large, oversized buttons are all the rage. So when my Sur la Tête hat needed its eleven 6-8mm buttons I ended up making them from beads.

Sur la Tête - Crown & Button DetailOne advantage of using beads to make my buttons is the drastic increase in color selection. I was certain to find a color that complimented any yarn I chose to use. In addition you can try pearls, crystals and even different shapes like rondelles or helixes. Suddenly my button choice was nearly unlimited! As a bonus, it can save you money depending upon what beads you end up choosing.

If color, size and shape selection is limited at your local bead store I recommend FusionBeads.com because they have free shipping for any size order, allowing you to order 1 of several different colors, shapes and/or sizes to try with your yarn or other project materials. Then you can place another order for the remaining beads you need and additional supplies.

Coiler Pliers

Supplies

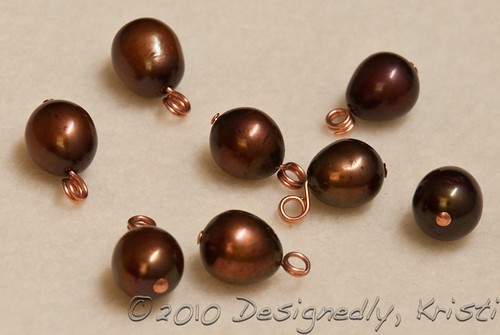
  • Single, Vertical Holed Beads (for Sur la Tête 6-8mm is recommended), if ordering online I recommend ordering 1-2 extra in case one arrives damaged or a hole was insufficiently drilled.
  • Head Pins, 1″ long for 6mm and 1.5″ long for 8 mm beads; longer head pins can be trimmed to size. There are many decorative head pin choices out there in addition to the standard flat round end.
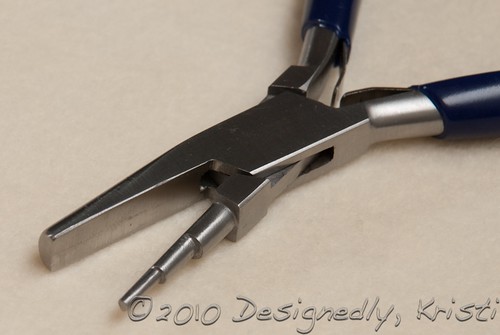
  • Coiler Pliers (see photo above), if you do not have coiler pliers, I recommend using several layers of masking tape to build up a guide on needlenose pliers to help you form consistently sized loops.
  • Wire Cutters, only if you are using longer head pins than needed.

Bead to Button: Steps 1 & 2

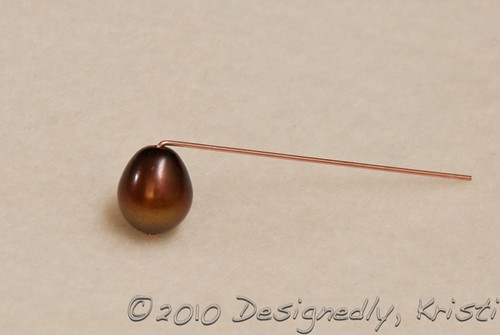
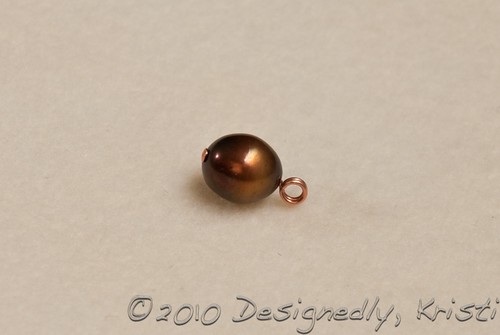
Step 1: Insert the headpin into the “prettier” side of the bead. Once attached to the project the shank side will be much less visible. If you are using irregularly shaped beads such as the cultured pearls being use here be certain to always orient the beads in the same manner so they look consistent when sewn on; in this case the larger side was entered first allowing the narrower end with the shank to sit sunken into the knit button band a bit.

Step 2: Bend the head pin at a right angle right where it exits the bead. I find it is easiest to get it tight against the bead by using my thumb and pushing the head pin against the bead.

Bead to Button: Step 3

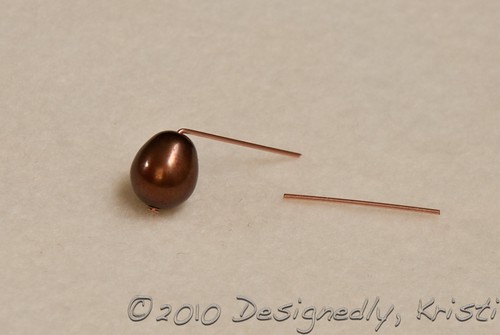
Step 3: If there is more than approximately 3/4″ or 2 cm of head pin extending beyond the bead trim it to length with a wire cutter.

Bead to Button: Step 4

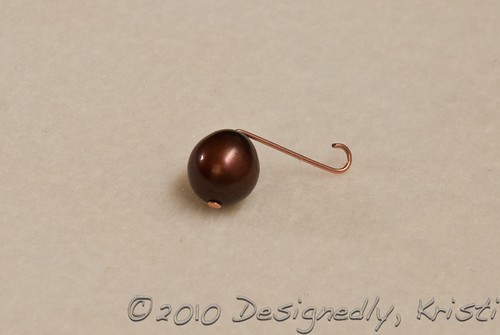
Step 4: Using the coiler pliers, grab the free end of the head pin and turn upwards and away from the bead to begin forming the coil that will create the shank for sewing the button onto your project.

Bead into Button: Step 5

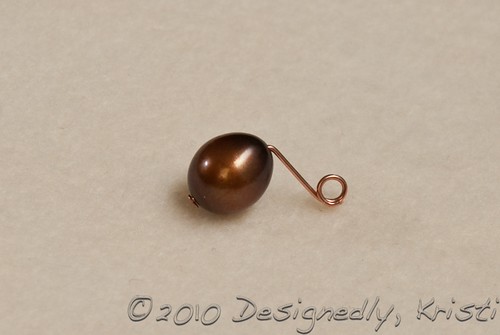
Step 5: Continue turning the pliers and regripping to form the loop until it sits snug against the top of the bead. If you form more than one complete revolution be certain to aling it snuggly with the previous loops. Two complete revolutions are recommended as they still sit mostly centered on the bead and it ensures that thin sewing thread will not work its way out of the loop.

Bead into Button: Step 6

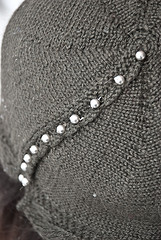
Repeat for each button required, attach and wear with pride!

In addition to using decorative head pins you could also try stacking a smaller bead atop the main one or use a lacy bead cap for an extra special touch. There really are an incredible number of button choices available once you start making your own.

Northern Colorado Sundog Sweater Class

Filed under: Classes — Kristi at 11:55 am on Thursday, March 4, 2010

Remember this cutie from October? That is Amanda’s eldest modeling a boy-friendly version of the Sundog Sweater that was published in the Summer 2009 issue of Twist Collective. I will be teaching a three week course on the sweater at My Sister Knits in Fort Collins beginning March 13th from 1-2:30pm. The cost of this class is $55 + materials (see below). To sign-up contact My Sister Knits in person at 1408 W Mountain Ave, Fort Collins or by phone at (970) 407-1461.

Sundog is a patterned yoke sweater that is knit from the top down with no finishing required! It features a few design elements to help it grow with the child so they get more than one season’s worth of wear out of it. In this class you’ll learn not only how to knit yoked sweaters from the top-down without any finishing, you’ll learn about sizing for children, knitting jogless stripes in the round and working with directional increases. In the class you will get a printed spreadsheet to help you keep track of the increases in the yoke as well as full-color handouts on how to work the recommended paired increases and knitting jogless stripes in the round. The pattern includes sizes from 20 inches to 34 inches.

Materials

  • Sundog Pattern from Twist Collective
  • For Chest Circumferences of 20 (22, 24, 26, 28, 30, 32, 34)” you need approximately 225 (275, 300, 350, 425, 525, 600, 700) yds of MC and 75 (75, 75, 100, 100, 125, 150, 150) of CC.
  • US 7 (4.5 mm), or size needed to achieve gauge, set of 5 dpns and a circular ndl 20-24” long
  • US 6 (4.0 mm), or one size smaller than size needed to achieve gauge, set of 5 dpns
  • Stitch Markers
  • Tapestry Needle
  • Waste Yarn

Pre-Class Homework: For optimum satisfaction, please be sure to have made a generous sized swatch before class that you have washed and blocked as the final sweater will be. If you do not match gauge with the pattern, repeat with different sized needles. If you have too many stitches per inch increase the needle size. If you have too few stitches per inch decrease the needle size.

Big Weekend…

Filed under: Knitting, Photography, Travel — Kristi at 12:02 am on Tuesday, March 2, 2010

This weekend was a full weekend. I took an all day photography workshop with Joe Coca here in Fort Collins (if you look at the “Things” category you may recognize a shot or two) about studio lighting. It was taught through the Center for Fine Art Photography. In the morning we walked through a few examples of lighting, some just virtually by stepping through all the various shots for a Handwoven magazine photoshoot. For one of the real time examples of studio lighting he walked us through he used my latest WIP! That was fun to see the process of deciding upon the lighting and how subtle changes highlight different aspects of the yarn or needles. In the afternoon we were broken up into groups and had to style and light a shot.

I think the biggest thing I learned was that I mostly know what I need to know (that was worth its weight in gold I think). I just need to be more patient and make sure I take the time to let my brain go through all of that. Oh, and if I’m working in a group I need to actually say what I’m thinking, not just think it and let them continue running farther off the rails. And, I could use an assistant and many more stands with clips and some lights, and the software to do live capture and,…and,… LOL!

Then Sunday I went on a mini road trip with Amanda to Niwot to visit The Berry Patch in search of the perfect finishing touch for my latest WIP and few secret FOs that needed some additional accoutrements. This was only my second time there, but I think I could spend vast amounts of money and time in that store. It is definitely healthy for the checking account to go there with very specific goals in mind, as well as a friend who can slap some sense into you when you start contemplating how much you can save in a month by eating only peanut butter toast to afford $72 worth of buttons for a project!

Unfortunately, Sunday is not the optimum day for road tripping as many of the stores of interest are closed - yarn, bead and fabric stores. Because of that we didn’t venture on to Boulder. On the way back home we did stop in at Bead Lounge in Longmont where they were having a one day trunk sale and we scored the very finishing touches was well.

It seemed only fitting to practice a little of what I learned on Saturday to capture some of the goodies from Sunday on Monday and share them on Tuesday :-)

« Previous Page