More About Pinhole Photography…
So, Amanda asked me to post a pic of my pinhole camera in the comments of my previous post. So, today I share what we did in the workshop and also some links that will give you more info if you want to try it on your own.
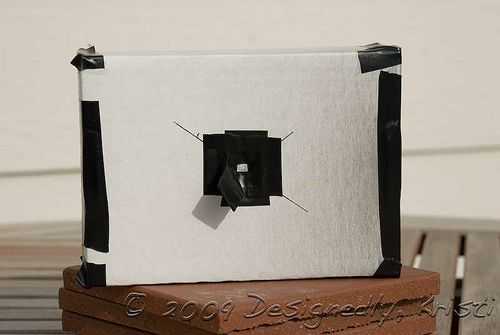
This is the outside view of the pinhole cameras we built in the workshop. They were made from a standard shipping box purchased probably at an office supply superstore. It is roughly the size of a very thick trade size paperback. Before assembly we spray painted the inside black to keep light from bouncing around inside of the camera body and muddying the image. We also used black electrical tape to cover any holes from assembly or perforations to make the box light tight. We did not tape the flap shut until the box was loaded with the photo sensitive paper though.
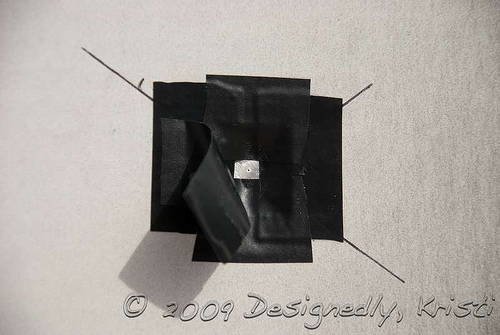
We also cut a 3/4″ square hole out of the center of the box bottom and compressed the edges down before attaching the actual pinhole. The pinhole was created using a piece of thin aluminum from a soda can (most of the people running the workshop used brass in their cameras). The hole was punched using a needle. We weren’t really given specifics but I heard a “size 10 beading needle” passed around in conversation. The bump created by punching the hole was then sanded down carefully with 400 grit sandpaper to fine tune the hole size and create cleaner edges to the hole so that the image would be sharper. It was then attached to the box with the “bump” side facing towards the world. Again, black electrical tape was used. There was also a need for a shutter so that the paper would only be exposed to the scene you chose to photograph. To do that we took a piece of black electrical tape (yes, again) and folded over a tiny bit on one end to act as a “handle” of sorts and put the rest of the sticky part over the pinhole. The tape needs to stick to and all around the pinhole otherwise the camera will not be light tight!
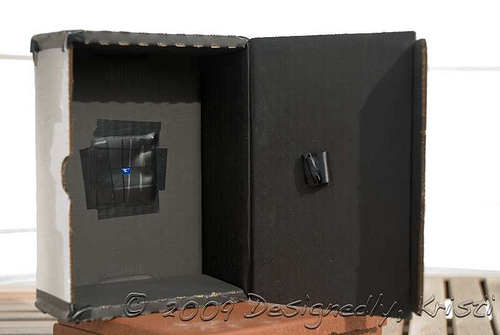
Next time I take this camera or some other pinhole camera out I will also place a small loop of tape to hold the shutter open as it is not uncommon to have rather long exposures and the tape “shutter” does not always like to stay open. To load the camera you must be in a dark room with safe lights and still expose the photo sensitive paper to the safe lights the least amount possible. We stuck our 4X5″ photo paper to a tape loop on the inside of the box top, closed the box and then sealed those edges as well with more electrical tape.
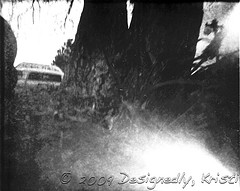 In my previous post I mentioned that I had a significant light leak in my first exposure. Well, things were rather rushed as this was a large workshop and only 6 people could be in the darkroom at a time so they threw together a second “darkroom” as a loading area in hopes of getting more people out taking pictures quicker. Things were kind of crazy and rushed and the one corner of my lid got missed by the electric tape in all the rush. The big “spray” of white originating from the lower right corner of that shot is a fantastic example of a light leak. I had a very slight one on my third exposure of the day as well (upper left) but it was located in such a way to not really detract from the photo very much.
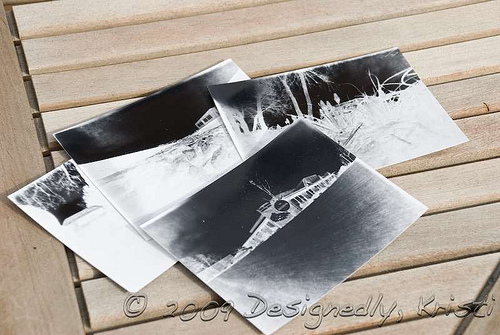
After developing and fixing the photo paper we then had paper negatives. These are upside down and mirror images of what the camera was pointed at. They were then scanned into the computer, inverted and in the case of my final photo that contained words, flipped. I did do a bit of post-processing such as tweaking levels and contrast etc. but what I did was very minimal so as to stick to the nature of pinhole photography.
Pinhole photography is not for those who seek perfection. As I mentioned in my previous post, you kind of have to guess at the exposure times and if you have a partly cloudy day where shots are sometimes in full sun and sometimes in diffused sun it gets trickier. You also do not have a view finder so framing your shot is trial and error. If you stick with the same pinhole camera you do eventually start getting a sense of what the view will be.
The thing that struck me was the inability to stray far from the darkroom because you needed that to load the camera for another exposure. At least that is true with this sort of set-up. Drew did overhear a story about one pinhole photographer who had 30 cameras made from altoid tins and would load them and take them all out on a shoot. Some have also engineered cartridge systems similar to what Polaroids used (some even reusing old Polaroid cartridges). There are also instructions out there on making pinhole cameras that use film which would give you more freedom. Some photographers in attendance at this workshop mentioned they thought pinhole photography was the only way they’d work through their stock of left over 35mm film.
Some more interesting reading and inspiration:
- Wikipedia has an introduction to pinhole photography, including some of the science behind it.
- Pinhole Visions, an online journal of pinhole photography has a good resource area.
- The Pinhole Gallery also has images and information and sources for supplies.
- For those wishing to impose more exacting calculations and such on pinhole photography check out Mr. Pinhole for guides to determine pinhole size, camera sizes etc.
- Pinhole Resource carries supplies and books and offers information on workshops.
- Quiche Lorraine is a pinhole photo blog with lots of great inspiration (though it doesn’t look good on my Mac since it only truly supports IE & Opera browsers and I run mostly Firefox and rarely Safari).
- Slowlight is another pinhole photo blog by artist Katie Cooke.
- Photojojo had a great article with many links last week.
- Corbis and ReadyMech have several fun looking ones that take 35mm film that you can download, print and build at home according to the instructions. One word of caution - while you’ll be using 35 mm film you won’t necessarily have standard image size so you need access to a developer that can develop and print uncut negatives. The comments on the page may help you locate such a service near you.
- Pinhole Photography Books and Kits On Amazon

- Lastly, if you don’t wish to experience the joy of building your own you can purchase them from Holga in a variety of formats.
Enjoy and be sure to stop back and share links to your experiments in pinhole photography in the comments!