Tutorial: Figure-8 Cast On onto 2 Circular Needles
While prepping for Saturday’s class this week I decided I should just share some of the work I’ve been doing with you. Then any students who misplace their handouts can look it up again and those who are not in the area and can’t take the class from me can still learn some of the techniques that will be taught in the class. Today, I’m bringing you some step-by-step photos of the figure-8 cast on on two circular needles.
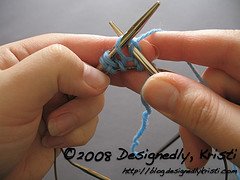
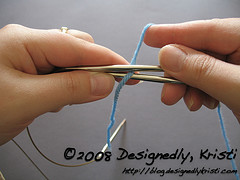 To start take one end of each of your circular needles and pass the working yarn between them. Make sure the tail is exiting towards you and the working yarn is exiting to the back of the needles.
This is what I call the neutral position. The yarn should always be in the position after casting on a stitch, whether it was cast onto the top needle or the bottom needle.
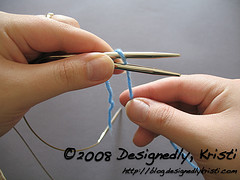 It took me a long time to remember the first step for this. If you can remember that the top needle is wrapped first then you just need to remember that the working yarn goes UP and OVER the TOP needle. Note how the yarn is back in the neutral position (or very near there) with the tail staying where it was, exiting towards you and the working yarn exiting the back of the needles.
 The stitches are always cast on in pairs, one onto the top needle and one onto the bottom needles. So, the next step is to wrap the bottom needles. Just remember the working yarn goes DOWN and AROUND the BOTTOM needle. Again, the step is complete when the yarn is in the neutral position. There are now two stitches cast on!
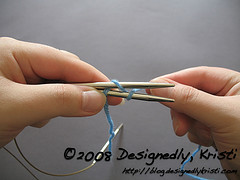
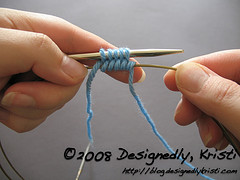
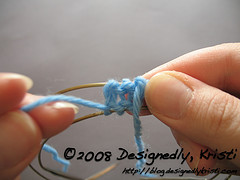
 Keep wrapping the yarn up and over the top needle and down and around the bottom needle until you have 1 or 2 extra loops on each needle. Here there are 5 stitches on each needle. I’m looking to cast on 6 stitches - 3 on each needle. Casting on a couple extra loops helps to keep the edge a bit neater. In a few steps we will be rid of the extras. The wrapping should always conclude with having wrapped the bottom needle and the yarn in the neutral position. This ensures equal stitches on each needle.
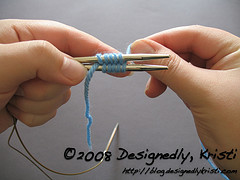
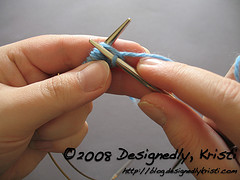
 Now, gently pull the bottom needle to your right and bring those loops to rest on the cable portion of its needle. This is the advantage of performing this cast on with circular needles. Having those loops rest on the cables gives you more play when completing the next step as well as essentially removes the inactive needle from the space near you hands. I personally find it much easier to execute a neat looking figure-8 cast on with circulars than DPNs. But, this technique can also be done on DPNs, you just omit this step.
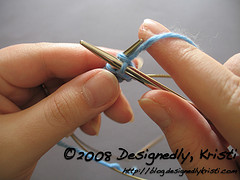
 Now knit the stitches on the top needle. You only want to knit 1/2 of the stitches you are casting on.
Here we are casting on 6 stitches so we knit across only three of the loops that are on the top needle.
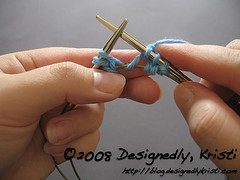 Here you can see there are three stitches that have been knit onto the right hand needle. There are still two loops over on the left, but you don’t need any more stitches. In the next step we’ll deal with these extras.
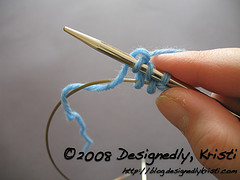 Just let those extra loops fall off of the left needle tip and let go of that needle tip as well. Then gently unwrap the tail from the cable, but be sure it still helps form that last stitch you knit.
It may be a bit loose and odd looking right now. As long as there is still a discernible stitch there don’t worry about it. We’ll deal with the wonkiness in a bit.
Turn your work clockwise to prepare for the next step.
 Now slide the loops on the cable of the bottom needle up into position on the tip of the needle. Pick up the other end and knit through the back loops of the three loops.
Knitting through the back loops on the bottom needle gets rid of twisted stitches which would otherwise give away the location of the seamless start.
You have now knit 6 stitches - three on each needle. We are not quite done though. Go ahead and rest the newly knit stitches onto their cable and turn your work clockwise again.
 If you look down at the backside of the fabric you just created you may notice the upper left loop that is not on a cable is larger than its mates. This is normal. It is because the tail is a bit loose. Gently give a slight tug to the tail until that loop matches its neighbors. Don’t pull too tight, you want the gauge to match up.
You may need to do this a few times, but once there is enough fabric that stitch won’t get distorted anymore.
 From the position in the previous step, the working yarn should be coming from the needle at the top. So, slide the bottom three stitches onto their needle tip and knit those once more.
This gives you some more fabric which will reduce the tension of any increases you make following the cast on. You’ve essentially knit a round and a half in the process of casting on the stitches. These are generally not considered a part of the overall round count in patterns.
 Turning the work clockwise after the previous step and folding that tiny little bit of fabric in half you can now see that teeny tiny start of a toe or the top of a hat! Also, note the the working yarn AND the tail are both coming from the right side of the piece of the fabric.
This is how you can tell when you are at the beginning of a round. If you are increasing rapidly it can become hard to determine whether that tail is coming from the same side or not so you may wish to mark what is now Needle 1 with a stitch marker or mark the fabric coming from Needle 1 with a safety pin etc. so you have an easier landmark. If you were to knit now you would be staring round 1 of the pattern.
For those of you who prefer video, watch below…
