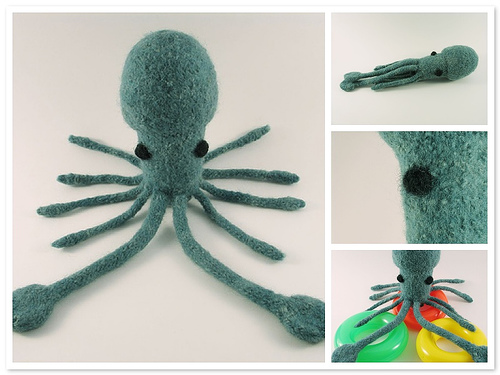
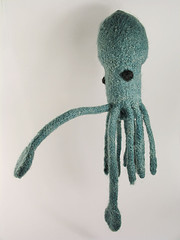
Pattern: My Own Based Loosely Upon the Naughty Squiddy
Yarn: 1.5 oz of left over Manos del Uraguay & a few yards of Black Lamb’s Pride Worsted
Needles: US 9 DPNs
Misc: Felting Needle, Darning Needle
Recipient: Spleeben, a friend of ours who is squid crazy!
Notes: I was going to follow the Naughty Squiddy pattern, but decided it needed some adjustments if I was going to felt it fully and stuff it rather than use it as the cover I’m assuming it was designed for (based on the name). I ended up making quite a lot of changes and will note them here so if anyone should wish to make their own felted Shoney you can…
Supplies:
~75 yd worsted weight feltable wool in color of your choice
~3 yd worsted weigth feltable wool in black of eye color of your choice
US 9 DPNs
Darning Needle
Felting Needle (recommended)
Polyfill
Make One of the Following (Body):
CO 26 sts onto 4 DPNs
Rnds 1-4: Purl.
Rnd 5-6: Knit.
Rnd 7: Purl.
Rnd 8-23: Knit.
Rnd 24: Purl, incr every other st (39 sts)
Rnd 25: Purl, incr every third st (52 sts).
Rnd 26: K1, ssk, knit to last three sts on ndl 2, k2tog, k1; rep for ndls 3 and 4.
Rnd 27: Knit.
Rep rnds 26 and 27 until 24 sts remain.
Rnd 28: *K1, ssk, k1, k2tog; rep from * to end of rnd.
Rnd 29: Knit.
Rnd 30: *Ssk, k2tog; rep from * to end of rnd.
Rnd 31: Knit.
Rnd 32: K1, *k2tog, k2; rep from * to end of rnd.
Cut yarn, and pass through remaining sts and draw tight. Pass the yarn to the inside and loosely weave the tail in a little. Since it will be felted there is no need to be overly cautious.
Decide which side will be the front of your squid and count off the middle six purl bumps in the lone purl row. This is where the two long tentacles will be attached.
 Make Two of the Following (Large Tentacle):
Use a DPN, CO 3 sts.
Knit 1 st from DPN, pick up one purl bump and knit it, and repeat for a total of 6 sts on the DPN. You can i-cord knit these six sts or knit on three DPns with two sts on each, whichever you prefer.
Rnd 1-33: Knit.
Rnd 34: K frnt and bck of each st (12 sts).
Rnd 35: Knit.
Rnd 36: K frnt and bck of every third st (16 sts).
Rnd 37: Knit.
Rnd 38: K frnt and bck of 1st and 10th sts (18 sts).
Rnd 39-40: Knit.
Rnd 41: *K2tog, k; rep from * to end (12 sts).
Rnd 42: *K2tog; rep from * to end (6 sts).
Rnd 43: *K2tog; rep from * to end (3 sts).
Using a yarn needle, pass the yarn through the center of the tentacle and back out, pull slightly, clip, then stretch the tentacle back out to pull the end of the yarn back into the center of the i-cord.
Make Eight of the Following:
Using the remaining purl bumps on that lone purl row, evenly spaced, pick up and knit three purl bumps for each short tentacle.
Rnds 1-18: Knit in i-cord fashion.
Rnd 19: Purl.
Rnd 20: K1, k frnt and bck, k1.
Rnd 21: Purl.
Rnd 22: K1, k frnt and bck of middle two sts, k1.
Rnd 23: *P2tog; rep from * to end.
Rnd 24: Knit.
Rnd 25: P3tog.
Using a darning needle, pass yarn through center of i-cord, pull slightly, clip, and stretch tentacle back out to pull yarn end into center of i-cord.
Make Two of the Following (Eyes):
Cut two 1-yd lengths of worsted weight black yarn. Decide where you wish to position the eyes. Fold each yd into a triple ply of about 12 inches in length and thread your darning needle. Then make a french knot for each eye, being sure that when putting the needle back through to the inside you do not go back through the same hole you came up as you would in regular embroidery. Tie a square knot on the inside and trim excess yarn. Repeat for the other eye.
Felting
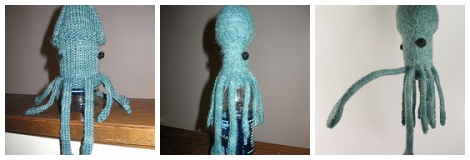
I hand felted Shoney in my bathroom sink in order to better control the shaping. Wear rubber gloves and run the water as hot as possible. You can up the temp by adding a kettle of boiling water as well. Add a touch of dishwashing soap (Dawn, Palmolive etc.) and put the squid in the water to soak for 5 minutes. Then agitate with your hands. You can control the shaping and such by the direction you rub it in. If you roll the squid between your hands it will reduce the circumference more than it will reduce the height. Occassionally dunk into a bucket of cold water to shock the wool. This will speed up the felting process significantly. Repeat until the stitchs are obscured to your liking and the size is what you are looking for.
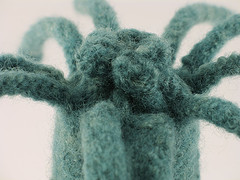
Roll the squid up in a towel and step on it to push excess moisture from the felt. Then stuff the top with plastic garbage bags to shape it and set to dry. I propped my guy on a water bottle so his tentacles could hang freely while drying.
Finishing
 Once dry, remove the grocery bags and stuff with fiberfill. Then, using some of the matching yarn, take about 1/4 inch gathering sts around the bit of felt that is below the tentacles. Pull tight and then take a few more sts moving across the gather to be sure it is closed up tightly. To make a more seamless look, carefully use a felting needle to blend the new yarn into the felt. You can also using the felting needle to refine some of the shaping and make the french knot eyes blend into the body some more.
Enjoy!
 In my week hiatus I did a fair bit of reading again. I checked out a book on how to use digital photos in art work from the library several weeks ago and finally got around to reading it. It is Theresa Airey’s Digital Photo Art, puiblished by Lark Books.