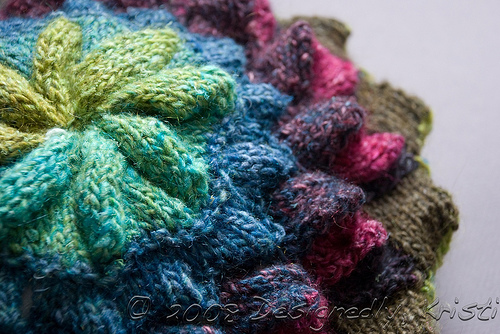
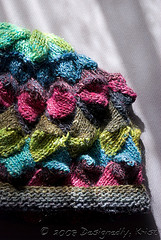
Pattern:Peak Brim Flare Crown Star Top Hat by Kathryn Alexander Yarn:Noro Silk Garden Lite, Color 2014 A Needles:US7 16″ Addi Turbos Size:~22″ circumference Modifications:I bumped the gauge up from the called for 5 sts per inch to what I thought was going to be 4.5 sts per inch because the 18″ of the hat as written wouldn’t fit me well. I didn’t wash my swatch and it ended up more like 4 sts per inch. I also add one row of traditional flat entrelac rectangles before beginning the dimensional entrelac so with that and the gauge change the hat was getting deep so I also took out the last round of rectangles in the crown.
Notes:Overall I love this hat in the Noro. My only complaint is that you change direction of knitting the hat and if that corresponds with you high contrast color in the yarn you get what appears to be a seam when you look at the hat spot on in that area. Kind of nitpicky, but if I were to knit it again with this yarn and that seemed to happen I’d cut the yarn there and re-attach elsewhere in the color repeat. Next time I’d also probably use US5 needles with this yarn to firm up the fabric a bit and decrease the circumference of the hat as it is a bit big at the moment. Speaking of a bit big, it is also plenty large in depth so after the party I may give it a bit of a light fulling to snug it up a bit and give it some added body.
I’m quite sad Katheryn’s patterns are only available in kit form. As a spinner and sometimes dyer I’d much rather either use yarns like Noro or spin and dye my own colors. Plus, I don’t make much money so the kits make it prohibitive to actually knit her clever designs. All of that aside, a kit or two of hers may be finding its way onto my birthday wishlist. The other hat patterns (which I looked at after I was making good progress on this one) were all forms that popped into my head while working the dimensional entrelac but I don’t have enough experience with entrelac and dimensional entrelac to reverse engineer them and I’d really love the tam! :-)
Filed under: Knitting, Socks, Tutorials — Kristi at 10:36 am on Thursday, February 28, 2008
While prepping for Saturday’s class this week I decided I should just share some of the work I’ve been doing with you. Then any students who misplace their handouts can look it up again and those who are not in the area and can’t take the class from me can still learn some of the techniques that will be taught in the class. Today, I’m bringing you some step-by-step photos of the figure-8 cast on on two circular needles.
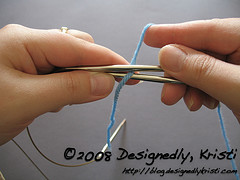
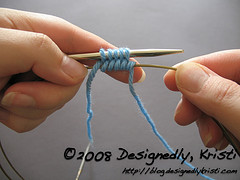
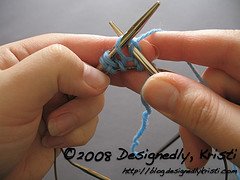
To start take one end of each of your circular needles and pass the working yarn between them. Make sure the tail is exiting towards you and the working yarn is exiting to the back of the needles.
This is what I call the neutral position. The yarn should always be in the position after casting on a stitch, whether it was cast onto the top needle or the bottom needle.
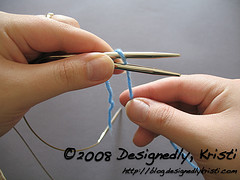
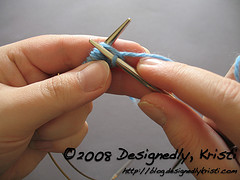
It took me a long time to remember the first step for this. If you can remember that the top needle is wrapped first then you just need to remember that the working yarn goes UP and OVER the TOP needle. Note how the yarn is back in the neutral position (or very near there) with the tail staying where it was, exiting towards you and the working yarn exiting the back of the needles.
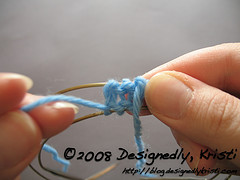
The stitches are always cast on in pairs, one onto the top needle and one onto the bottom needles. So, the next step is to wrap the bottom needles. Just remember the working yarn goes DOWN and AROUND the BOTTOM needle. Again, the step is complete when the yarn is in the neutral position. There are now two stitches cast on!
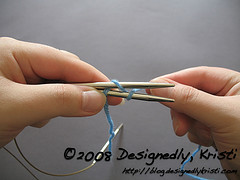
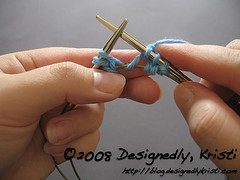
Keep wrapping the yarn up and over the top needle and down and around the bottom needle until you have 1 or 2 extra loops on each needle. Here there are 5 stitches on each needle. I’m looking to cast on 6 stitches - 3 on each needle. Casting on a couple extra loops helps to keep the edge a bit neater. In a few steps we will be rid of the extras. The wrapping should always conclude with having wrapped the bottom needle and the yarn in the neutral position. This ensures equal stitches on each needle.
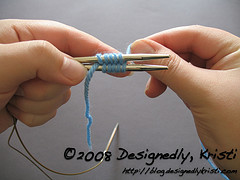
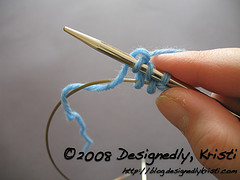
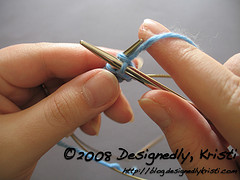
Now, gently pull the bottom needle to your right and bring those loops to rest on the cable portion of its needle. This is the advantage of performing this cast on with circular needles. Having those loops rest on the cables gives you more play when completing the next step as well as essentially removes the inactive needle from the space near you hands. I personally find it much easier to execute a neat looking figure-8 cast on with circulars than DPNs. But, this technique can also be done on DPNs, you just omit this step.
Now knit the stitches on the top needle. You only want to knit 1/2 of the stitches you are casting on.
Here we are casting on 6 stitches so we knit across only three of the loops that are on the top needle.
Here you can see there are three stitches that have been knit onto the right hand needle. There are still two loops over on the left, but you don’t need any more stitches. In the next step we’ll deal with these extras.
Just let those extra loops fall off of the left needle tip and let go of that needle tip as well. Then gently unwrap the tail from the cable, but be sure it still helps form that last stitch you knit.
It may be a bit loose and odd looking right now. As long as there is still a discernible stitch there don’t worry about it. We’ll deal with the wonkiness in a bit.
Turn your work clockwise to prepare for the next step.
Now slide the loops on the cable of the bottom needle up into position on the tip of the needle. Pick up the other end and knit through the back loops of the three loops.
Knitting through the back loops on the bottom needle gets rid of twisted stitches which would otherwise give away the location of the seamless start.
You have now knit 6 stitches - three on each needle. We are not quite done though. Go ahead and rest the newly knit stitches onto their cable and turn your work clockwise again.
If you look down at the backside of the fabric you just created you may notice the upper left loop that is not on a cable is larger than its mates. This is normal. It is because the tail is a bit loose. Gently give a slight tug to the tail until that loop matches its neighbors. Don’t pull too tight, you want the gauge to match up.
You may need to do this a few times, but once there is enough fabric that stitch won’t get distorted anymore.
From the position in the previous step, the working yarn should be coming from the needle at the top. So, slide the bottom three stitches onto their needle tip and knit those once more.
This gives you some more fabric which will reduce the tension of any increases you make following the cast on. You’ve essentially knit a round and a half in the process of casting on the stitches. These are generally not considered a part of the overall round count in patterns.
Turning the work clockwise after the previous step and folding that tiny little bit of fabric in half you can now see that teeny tiny start of a toe or the top of a hat! Also, note the the working yarn AND the tail are both coming from the right side of the piece of the fabric.
This is how you can tell when you are at the beginning of a round. If you are increasing rapidly it can become hard to determine whether that tail is coming from the same side or not so you may wish to mark what is now Needle 1 with a stitch marker or mark the fabric coming from Needle 1 with a safety pin etc. so you have an easier landmark. If you were to knit now you would be staring round 1 of the pattern.
Filed under: In the Kitchen — Kristi at 8:49 am on Wednesday, February 27, 2008
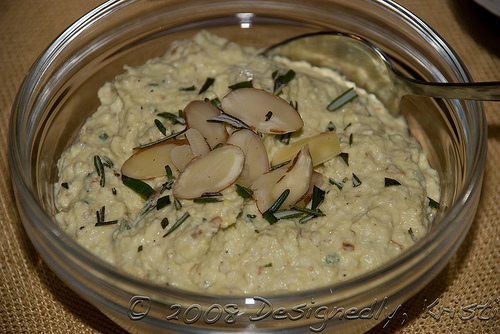
Okay, many you asked for it, so I am sharing my recipe for Lemon Artichoke Pesto. It is a great recipe this time of year when the fresh ingredients of many pestos are unavailable. While I much prefer my traditional pesto and my chimichurri to be hand chopped, this one is much better in a food processor, making it a good lazy night option as there is little to chop.
Lemon Artichoke Pesto
yields ~1-3/4 C
1 - 14 oz can Quartered Artichoke Hearts
Zest and Juice of One Lemon
1-2 Cloves Fresh Garlic, chopped
1-1 1/2 T Fresh Rosemary, chopped*
1/2 t Coarsely Ground Black Pepper, or to taste
1 1/2 t Salt, or to taste
1/4 - 1/3 C Toasted Sliced Almonds
1/4 - 1/3 C Olive Oil
2T Warm Water (optional)
Place all ingredients but the almonds and olive oil into a food processor. Pulse until mixture is coarsely chopped. Add toasted almonds and pulse some more. Pause to scrape down the sides as needed. Once the mixture seems mostly homogeneous, start with a 1/4 of olive oil and pour it slowly in the processor as it runs. Many food processors have a hole in the guide for the chute, if yours does just dispense the olive oil into that and it will do the rest. Let the processor run until the oil has been emulsified with the other ingredients. Take a taste test and adjust any of the seasonings and determine if it requires more liquid. It should be the consistency of a slightly loose hummus. If it needs thinned yet you can had more olive oil or for a little lighter pesto add a touch of warm water, again slowly while the processor runs.
I like this pesto fairly thick because we often use it as a condiment when serving antipasto. It is equally good on pita chips, bread, crackers, polenta, raw veggies and more. If you want it on pasta like traditional pesto I recommend adding a bit of the pasta water to the pesto just before tossing it with pasta. It is really good on angelhair pasta with a garnish of chopped kalamata olives!
I’d love to hear how you serve it!
* If you don’t have access to fresh rosemary (check the produce section of your grocery store, often near the bagged lettuces) you can substitute dried. If you plan to use dried rosemary cut the amount in half and plan to let the pesto sit at least a few hours before serving so the flavor can migrate and the dried bits of rosemary rehydrate.
Filed under: Lemming, Fibery Friends — Kristi at 11:00 am on Tuesday, February 26, 2008
Earlier this month I was tagged by Gadabout Knitter and Puttermeister as having made their days. I figured it was about time I passed it on. I’m obviously a pretty visual person so my list as I make to today is a bit skewed toward those with good photography…
Cyndy of Riverrim has gorgeous nature photography and makes you feel as though you truly are walking with her on Wednesdays.
Twisted Knitter has such gorgeous closeups of yarn and fibery projects that it is almost as though you are touching them!
Yarnstorm manages to bring bright and bold color to her posts daily and it feeds the soul in this oft cloudy days of late winter.
Adrienne of Hello Yarn is sure to serve up many clean and uncluttered shots of a project, giving you a clear look at all the details and giving you a sense of having closely examined it in person yourself.
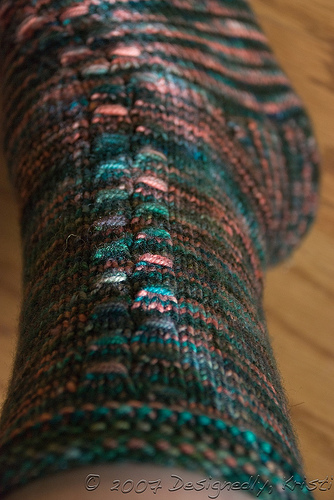
I’m not sure I really blogged about this sock back when I knit it. I knit it while on “vacation” in October. It was my break from all the deadline knitting and spinning I was doing. But, because there was plenty deadline stuff waiting at home it meant I haven’t even started sock 2 yet! But, that works in my favor now. Why? Because now I have a class sample sock and a sock to work on in a class.
Due to the high demand for more sock classes at My Sister Knits I am teaching a last minute addition to the class line up on Saturday morning. It is the Jeweled Steps sock from Cat Bordhi’s New Pathways for Sock Knitters Book One (p 106). Because we need to get down the figure-8 cast on and get enough toe knit to measure both stitch and row gauge, the first class is 3 hours and runs from 9am to noon. The following two weeks will only run until 11am.
In the class you’ll learn:
- The Bordhi sidestream architecture, including using the master tables and doing any calculations
- The figure-8 cast on
- Bordhi’s preferred increase of LRinc and LLinc
- Bordhi’s no stitch pick-up heel
- EZ’s sewn bind off
You’ll need ~400 yards of fingering weight sock yarn, two circulars in size needed to obtain 8 sts/in (preferably of two different lengths between 16 and 24 inches), 4 unique stitch markers, row marker, tape measure, gauge measure, tapestry needle, pen or pencil, and a calculator if desired.
The class is $75. We meet March 1st from 9am-noon, March 8th from 9am-11am, and March 15th from 9am-11am. You can reserve a space by calling the store at (970) 407-1461. The last I knew there were only two slots left, but I thought I’d let any Fort Collins area lurkers know. Don’t worry, this won’t be my last class. I’ll be teaching some of my designs there come late spring and summer.
Speaking of my designs, you can now get print versions of *all* of my patterns at My Sister Knits! And there are a few more places coming soon!
 Pattern:Peak Brim Flare Crown Star Top Hat by Kathryn Alexander
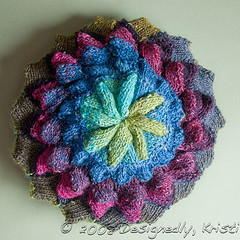 Notes:Overall I love this hat in the Noro. My only complaint is that you change direction of knitting the hat and if that corresponds with you high contrast color in the yarn you get what appears to be a seam when you look at the hat spot on in that area. Kind of nitpicky, but if I were to knit it again with this yarn and that seemed to happen I’d cut the yarn there and re-attach elsewhere in the color repeat. Next time I’d also probably use US5 needles with this yarn to firm up the fabric a bit and decrease the circumference of the hat as it is a bit big at the moment. Speaking of a bit big, it is also plenty large in depth so after the party I may give it a bit of a light fulling to snug it up a bit and give it some added body.
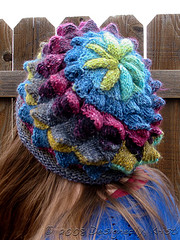 I’m quite sad Katheryn’s patterns are only available in kit form. As a spinner and sometimes dyer I’d much rather either use yarns like Noro or spin and dye my own colors. Plus, I don’t make much money so the kits make it prohibitive to actually knit her clever designs. All of that aside, a kit or two of hers may be finding its way onto my birthday wishlist. The other hat patterns (which I looked at after I was making good progress on this one) were all forms that popped into my head while working the dimensional entrelac but I don’t have enough experience with entrelac and dimensional entrelac to reverse engineer them and I’d really love the tam! :-)