Turning Batts into Roving
Like others I did some “training” for Tour de Fleece. Despite sore feet, last Friday I finished my first bobbin of singles for my Solar Dyed Spun Stitches Shawl (no, still no shawl pattern chosen). Yesterday I was antsy. I’m having issues beside my feet and am rather miserable at the moment so I finally decided I was going to spin anyway - bruised feet and cracked fingertip be damned!
To get the second bobbin of singles going I needed to prep another one of the batts that I had made. I recalled getting asked about my technique of preparing the batts so I took photos as I did it last night. I hope you find it useful.
Batts are rectangular pieces of drum carded fiber. They are the width of the carder and the length of the circumference of the drum. There are many different ways to spin from the batts, including rolling it into a tight cylinder and spinning from the end of that. In this case I wanted to turn my batt into something resembling roving. We’ll call the finished product “roving.”
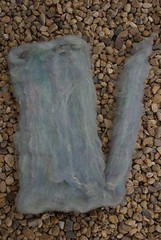 The first step is to orient the batt in the portrait form, that is with the longest side vertical and the shorter side horizontal. Starting in the upper right corner begin to tear a strip of the batt away from the main piece. Be sure to choose a width that is measurably thicker than what you’ll need in your drafting zone to achieve the weight yarn you need. Here it was 2-3 fingers wide and I’m spinning lace weight singles. Continue to the tear until you are near the bottom edge of the batt. Stop when you are roughly the same distance from the bottom of the batt as your strip is thick.
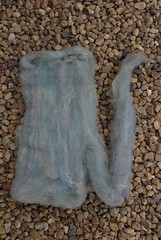
Move over the same thickness as the first strip and start a new tear in the batt, moving upwards and once again stopping before the end of the batt. Continue making these zig-zag rips in the batt until you have formed on long strip of fiber.
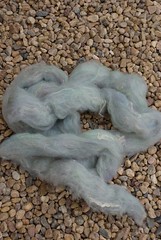
From the tearing the strip of fiber will be a bit rough around the edges. There will also be those obvious turns in the strip of fiber as well. If you made your strips sufficiently thick you can now pre-draft the strip of fiber to clean it up and make it more resemble roving. In the photo on the right I made two passes of predrafting. Look how much longer, and nicer looking it is!
The pile of pre-drafted roving is much more than I can get through in one spinning session so I roll it up into a nice ball of roving. I introduce a bit of twist as I form the ball to help hold the fiber together and give it a bit more stability. Below you can see the fiber in its three states - the original batt, the spun singles and a ball of “roving.”

The photos with step-by-step notes can also be seen in my Flickr Set.
