Carving 101
Transferring the Design
For ease of transfer, I recommend trimming your design to at least slightly smaller than your carving material (unless you are using the ironing method which I have no experience with so will not describe in detail). In the photo below, I used so much of my carving material I could not really trim it sufficiently and still have paper to hold down. Also, if you are using an eraser with an embossed or printed design, you will need to use the #400 sandpaper to lightly and evenly remove that from the eraser. Be careful to not create indents or you could have troubles getting a good impression from your carving.
Tissue Paper Method
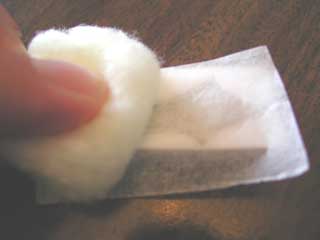
Now, place your image on the carving material face down and burnish the design onto the carving material. I like using a cotton ball because I find it helps me from tearing or moving the tissue paper. Some other suggestions that came up during class were a pop bottle cap (thanks, Raven), a bone folder or just your fingernail. You can slowly lift the corners to check the transfer. If it has areas that haven't transferred, set it back down and continue burnishing. Repeat until you are satisfied with the transfer. This method will not produce a real dramatic transfer.
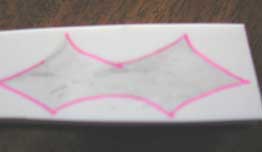
Just as pencil tends to smudge on paper, it will also smudge on carving material, so you may wish to trace the outline of your design with a ball-point pen. In the example shown below I used a pink gel pen so you could see it well, but it matches my test ink pad and that does not work well. You should use an ink darker than your test print ink pad so that it still shows after making test prints.
Toner and Acetone Method
As in the tissue paper method, place your image face down on the carving material. Then, using a cotton ball dampened with acetone, rub it over the back of your design. Burnish it like above. You can lift up corners to check the progress of your transfer. If it looks like it needs more burnishing, just set the corner back down and rub some more.
There are some alternatives to acetone. Of course nail polish remover that contains acetone works or the Xylene photo transfer pens will work and a better smelling alternative is wintergreen oil which you can get at your local pharmacy. If opting for the nail polish remover, the cheapest kind with not extra vitamins or nail strengtheners seems to work best.
Sharpening Your Tools
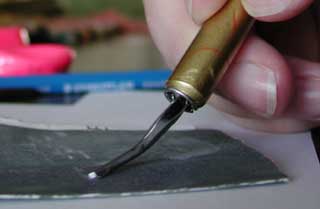
The gouges and knives often sit in the stores and warehouses for months before you purchase them and this causes them to dull. Yes - not using them dulls them. They oxidize and that removes the honing on the edges. So, I faithfully sharpen my tools slightly before every use. To do this, use #400 grit sandpaper. Hold the gouge at about a 20-30 degree angle and make small circles (see photo below). Repeat to the other side of the gouge. Then, fold the sand paper, grit side out and run the fold through the "v" 2-3 times. I like to test the sharpness on scrap of carving material to see how easily it cuts. It should cut with very little resistance. The amount of resistance will vary depending upon the carving material you are using.
< Return to Choosing you Design :: Continue on to The First Cuts >