Fiber Fool

Follow the feats and foibles of a fiber fanatic.

Happy Socktober!

Filed under: Socks, Knitting Patterns — Kristi at 11:50 am on Monday, October 4, 2010

DK Sock Pattern Mosaic

It only just occurred to me that it is now Socktober! Since I’ve got my head down and working I didn’t get a chance to design something specifically for Socktober, but I’d still like to celebrate in some way. So, now that coupon codes and sales promotions are working in Ravelry shops I’m gonna test out all the ways to run them ;-)

For the remaining days in October you can save 20% on all my sock knitting patterns in my Ravelry shop. Just head to click here to activate the code, or enter SOCKTOBER in the “Use Coupon Code” field while shopping. It is a one time use per customer code. Feel free to share it with others and spread the word.

Working Weekend…

Filed under: Knitting, Photography, Knitting Patterns, Designing — Kristi at 5:16 am on Monday, August 16, 2010

Kate Shawl

It was a fun kind of working so I’m not complaining. Most of the weekend was dedicated to photography. There was a very early morning photoshoot on Saturday with Amanda (many thanks go out to Bob and Sue for taking care of the kiddos). I should probably qualify my “very early” - my typical bedtime the past 6 weeks or so has probably averaged about 2-2:30am, so with a bedtime like that a 7am photoshoot is very early. Then there were quick edits that evening followed by more refined edits on Sunday once the top picks were chosen. Above is a sneak peek of the results.

Due to working, however, I don’t have my linkity pulled together. In fact, the whole week last week was pretty busy so my Google Reader is indicating more than 300 unread posts :-/ I’m hoping to catch up on that a bit today. Since 10 on Tuesday is not happening this week I’ll have linkity for you tomorrow. An even exchange of one list for another, right?

I did get in a quick trip to the farmer’s market and got some of the most amazing heirloom tomatoes I’ve ever had and was excited to see the roasted chilies are now in season as well as pears and more varieties of peaches! The usual eggs and mushrooms came home with me as well. So it wasn’t *all* work, but very busy nonetheless. What did you do this weekend?

Contest: Blocking Sawtooth Edgings?

Filed under: Knitting, Contests, Lace, Designing — Kristi at 4:39 pm on Tuesday, August 3, 2010

Half of Seraphim

Yesterday morning I bound off the last stitch on a design that has been about 6 weeks in the making. It has been a fantastic journey and one I hope to repeat in the future. It involved many swatches, two of which I blocked like the finished object (in two different weights of yarn). Now it is time to block the final object and I don’t know how to do it.

I do only have one pointed edge shawl I’ve knit, Seraphim by Miriam Felton (shown above) and I did so in a sport weight yarn (Brown Sheep’s NatureSpun Sport). It was not nearly as pointy a design as this or knit sideways to the body either so I had just pinned out each tip individually.

I’m not quite happy with the blocking job on either of the swatches for this project. Now it is time to block the final project and I’m uncertain about how to proceed. Let me show you extreme close-ups that don’t give away too many details, as I probably shouldn’t be talking about this project…

Pointed Lace - Blocked

For the first swatch I used wires to block the main portion, then I used T-pins to individually block each point of this sawtooth edge. The swatch was only about a quarter of the size of the final project and I ran out of T-pins about three-quarters of the way through those. In addition to my needing to purchase at a minimum two more boxes of T-pins, it takes a long time to block each of those out. If I could have shown you a wider angle you would also see more clearly that the points were not equally blocked and I’m pretty sure I could have fussed with pin placement on the swatch for the entirety of a day and still found ones that required slight adjustment.

Pointed Lace - Blocked

So, when it came time to block the fingering weight swatch I decided to try a different tactic - run my blocking wires through each point on a side and pin the center 1-3 repeats individually as needed. That way they are all pulled the same distance from the body and blocked probably as equally as is humanly possible. Absolutely a fantastic idea in principal. In practice, not so great a fit with a knitted on edging whose stitches run perpendicular to those on the body. I found I had to run the wires through two stitches for each point. If I only caught a single stitch it just drastically distorted that stitch and did not effectively block the edging. I continued on merrily thinking it was going to be great. It looked good while it was lying on the bed drying. Wrong! Notice how each point is actually two rather distinct loops? Not quite the effect I’m going for here.

Up to this point I’ve used welding rods for blocking wires. They are great for straight lines because they don’t bend and bow as easily so if you aren’t doing extreme blocking they only need pinned down at the ends. When I stopped in at MSK today I picked up their last in stock blocking wire kit. These blocking wires are probably nearly half the diameter of my welding rods. What is your experience? Will I lessen (or hope of hopes eliminate) the two-loop points with a smaller circumference blocking wire?

How would you go about blocking something with an almost saw-tooth edge like this? Keeping in mind that there are well over 100 points to be blocked in the full-size finished object?

Why don’t I turn this into a contest! Give me a suggestion and your name will go in a drawing for a free electronic copy of the pattern once it can be released to the general public. I’ll draw one more name from that pool for every 25 suggestions I get on this post. Because I’m under a deadline and need to get this blocked and photographed soon, comments will close on Friday, August 6th at 11:59pm MDT.

Would you like more chances to win?

  • Share the contest on your blog and trackback or leave a comment with a link to the post in a comment (trackbacks and comments for extra entries do not count towards the 25 suggestions increments).
  • Follow me on Twitter and post a tweet about the contest. Be sure to include @fiberfool in your contest tweet so it gets counted and please tweet only once per day!
  • Like Designedly, Kristi on Facebook and share the contest on there. Leave a comment here with a link to your Facebook post.

I can’t wait to hear your suggestions!

ECF: More Secrets… (& I’m a glutton for punishment)

Filed under: Knitting, Follow the Flock, Eye Candy Friday, Designing — Kristi at 11:52 am on Friday, July 2, 2010

Stranded Colorwork Knit Flat

Here is a peek of what I’ve been playing with this week. I’m busy working on writing the MSK July newsletter and getting some other patterns ready to go out to test/sample knitters so there hasn’t been a lot of knitting time this week. Though to be honest, I’ve knit this little piece of fair isle a couple times.

Your eyes are not deceiving you. This is stranded colorwork knit flat. I know that is practically unheard of. We all know I like nothing more than a big challenge though, right? In truth, it isn’t terribly difficult. I wouldn’t want to knit an entire sweater this way. Steeking is definitely the way to go. But, thanks to knitting backwards, working colorwork flat is not too difficult. I’m glad that I had learned to knit backwards and knitting entrelac though. It probably would be a tad more tedious if I was also learning how to knit backwards. I taught myself by turning the work and getting the needles and yarn into position than turn it back to have RS facing. I’m glad I did that because I almost always have to refresh myself on how to do it when I do use it. It isn’t something I use regularly.

Knitting backwards is a great skill, as I mentioned, for entrelac, or anything that is somewhat narrow and annoying to keep turning your work. One could even do it for heel flaps! Also, if you hate purling you might find backwards knitting (knitting from left to right) more enjoyable. If you’re curious about knitting backwards there was an article in Knitty back in 2006 and there are a few YouTube videos as well - for throwers like me (with voice instructions) & for continental knitters (with no voice instructions). In actuality, for stranded colorwork I use both techniques because I prefer to carry a yarn in each hand when knitting fair isle.

Stranded Colorwork Knit Flat!

I thought maybe this weekend would be for lots of knitting, but it has filled quickly. Though, oddly with no plans for the actual holiday. So, perhaps Sunday will be full of lots of knitting. I can hope anyway :-) The heat wave is supposed to break then so that would be great actually.

I’m working on a mini-theme for my ECFs for the upcoming weeks. I’m hoping I can maybe keep the idea going through the entire summer. If it looks like it is going to pull together I’ll share it with you and hopefully have the first in the series next Friday. I’m kind of excited about it and the list of “possibilities” keeps growing and growing.

To all my fellow Americans - Happy Independence Day! Please be safe and enjoy yourselves!

June’s Pattern - Stellar Facecloths

Filed under: Knitting, Finished Objects, Knitting Patterns, Designing — Kristi at 12:07 pm on Tuesday, June 8, 2010

Stellar Facecloths

My stockpile of facecloths has been slowly dwindling over the last few years as they’ve worn out and I haven’t replenished my stock in at least 5 years. Looking at my sad stack of 5 cloths remaining I decided it was time to remedy it. At first I was going to hit my local Bed Bath and Beyond or Target, but then decided small projects and non-wool yarns are prefect for the needles in the summer when the house temperature often soars to 80+ degrees by late afternoon so I decided to make some fun and special facecloths to make my beauty rituals more fun and a special treat rather than something to hurry through to get to work or bed.

An Upcoming Pattern

With July 4th coming up my mind had turned to stars. Not 6 or 8 pointed stars, but the good old 5 point star. Well over a year ago when I was messing around with mitered knitting I had thought about making stars with the technique. When I set out to make a 5 pointed version however I had no idea what I was getting myself into! The first attempt I had misplaced the increases and decreases and was getting a pentagon rather than a star. A rookie mistake, but I hadn’t worked with mitering in a while and hadn’t bothered to reference anything on the first try.

Stellar Facecloths

Having jogged my memory of how you want to place the increases and decreases in relationship to each other to create the mitering I blithely continued onto trial two, but decided to use a few patterns as reference material and they ended up steering me wrong. I suppose that is what I get. I ended up with something very starfish-like as the center bulged and the points curled quite a bit. The kicker was that I thought the placements of the increases and decreases was odd, but it was clear I was getting actual points so once again I did not listen to the voice in my head and knit a whole cloth before realizing round 2 was not the answer. The result was kind of cool, but really not what I was going for.

Stellar Facecloths

The third attempt was closer. I got straight and properly proportioned points on the star, but #3 would have made a much better pastie for someone even more graciously endowed than myself, LOL! The center would not lay flat and since I was working with an inelastic blend of cotton and bamboo blocking it flat was not an option. Not to mention who wants to have to severely block their washcloths? That just doesn’t seem practical.

Stellar Facecloths

To remedy the bulging center problem I decided I needed to both start with more stitches and increase at a faster rate. It worked for the fourth one. I got a nice facecloth that would lie flat, but my points on the start were kind of skinny and took away from the inner circumference of the cloth. Since I can’t imagine the points being used for much more than removing eye make-up I didn’t want to sacrifice the size of the non-point section of the star so it was to the drawing board AGAIN!

Stellar Facecloths

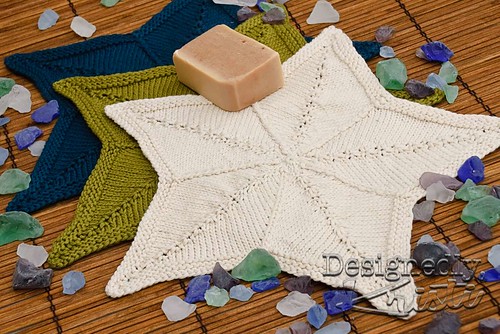
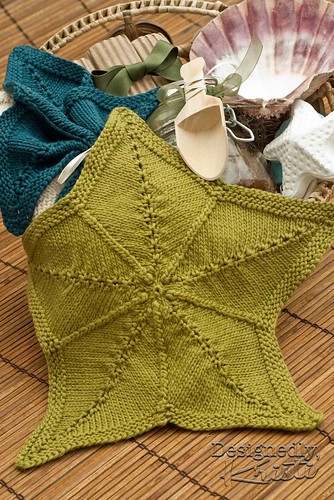
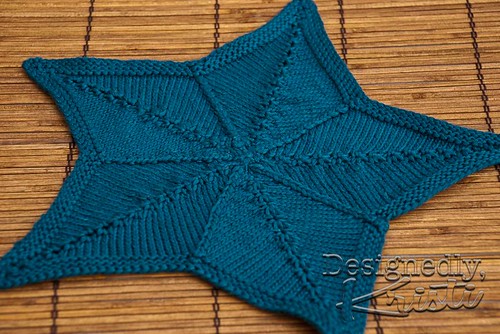
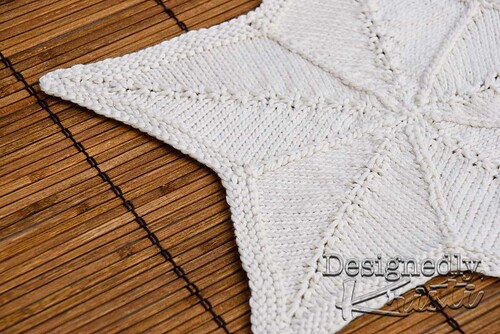
The fifth time was the charm in this case. I ended up combining trials 3 and 4 into what has become the official Stellar Facecloth pattern. What I had been envisioning to be a couple days design project ended up taking me the entire month of May! Not quite exclusively, but it got the bulk of my design attention for the month. While some have thought me nuts to keep trying I’m glad I did. I really like the outcome. It is a nice and generous size cloth (12.5″ from point to point), it has a very pleasing star shape, and it only requires laying flat to finish drying (you can partially dry it in the dryer) rather than a true pinned blocking.

Homemade Sugar Scrub

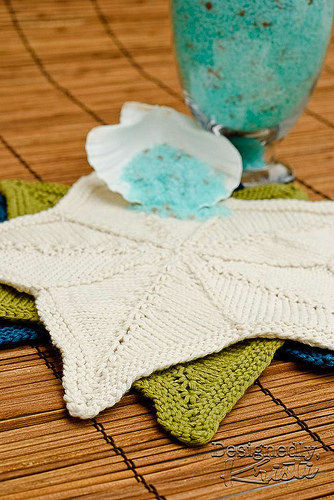
These three were knit from Frog Tree’s Picoboo, a fair trade pima cotton and bamboo blend yarn. I’ve never used a blend for washcloths before so we’ll see what I end up thinking about them once they come home from My Sister Knits. Or, maybe I’ll be able to squeeze a striped one from the leftovers that I can keep at home and try. Supposedly bamboo fiber is anti-bacterial which would be valuable in a facecloth so I decided to give it a try. Plus, the slight sheen makes the washcloths seem that much more “special.” The yarn is classified as a sport weight by Frog Tree, but I think it is probably on the line between sport and DK. I opted for US5 needles because mitering tends to make fabric a bit more stiff. Normally for facecloths my tendency is to go down 1-2 needles sizes from the recommendation because when cotton is wet it stretches so easily. But US5s were perfect in this application.

Homemade Sugar Scrub

The pattern is free for the month of June only in the My Sister Knits June 2010 newsletter which is available on their Community News page! I put it up last Friday and I can’t believe the amount of hits it has gotten in such a short period of time. I’m so excited and want to thank those of you who helped get the word out. The amazing response tells me it was worth the five tries to get the shape just right!

« Previous PageNext Page »