The feats and foibles of a fiber fanatic.
4/4/2006
Lolly has chosen some wonderfully appropriately springy colors for April’s Project Spectrum - Yellow and Orange! And really, even those in the southern hemisphere should do okay with the orange in autumn as well.
In honor of Project Spectrum yesterday I made myself a Project Spectrum lunch and also captured a few other foods in the kitchen that were Orange and Yellow…
1. April PS Lunch in the Making, 2. April PS Lunch, 3. April PS Peppers, 4. April PS in the Pantry
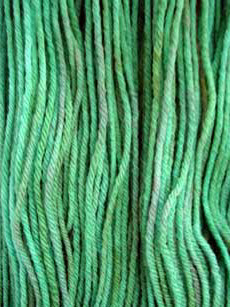
This weekend I also did some dyeing. Again with Wilton’s and a touch of Kool Aid as well.
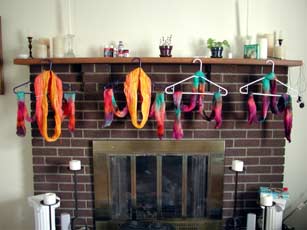
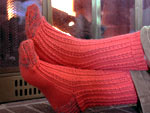
This is what our fireplace/hearth looked like on Saturday morning, LOL! It looks kind of like Christmas, but with whacked out colors!
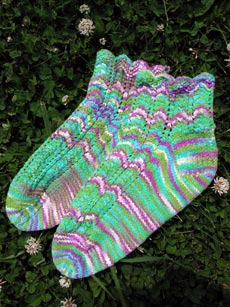
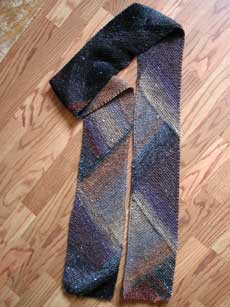
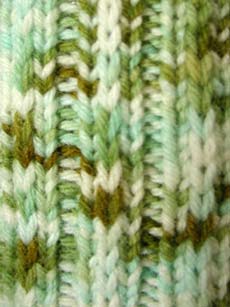
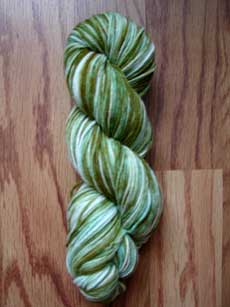
I did some Project Spectrum sock yarn dyeing using a similar method of dyeing as I used in the Bayou yarn, but this time I double dyed it - once in rose (tweaked a touch with some green to tone it down every so slightly) and then the balls rewound the other direction and dyed again in lemon yellow in a *very* strong solution.
I also did some fiber dyeing for the first time. I’ve been so paranoid that I would felt it that I hadn’t tried it. But after being afraid of felting fleece when washing it and being successful in that I decided I could dye fiber without felting it. Both sets of colorways are dyed with the same four dyes that I mixed based on the colors of my Not-So Squatty Sidekick. The differences in them are just in the percentages used of the different colors. Isn’t that amazing?
1. Snow Cone Roving Pre Drafted and Not, 2. Snow Cone Roving, 3. A Comparison of Northern Lights Roving Pre Drafted and Not, 4. Northern Lights Roving
I also took the opportunity to put together a few Project Spectrum Desktop Wallpapers for the month of April seeing as how the March one went over so well and Scout informed me I should do so for each month of Project Spectrum… So, if you click on these just hit “All Sizes” right above it and choose the size appropriate to your computer desktop and right click to set as wallpaper in most browsers. I hope you enjoy!
2/15/2006
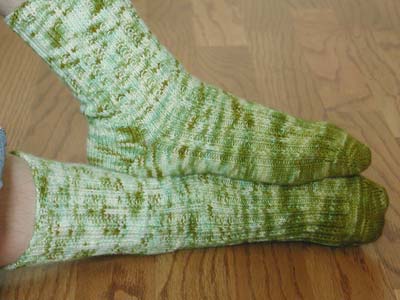
Pattern: DK Swamp Socks (to be available soon), 64 Sts
Yarn: 1 Skein Knit Picks Color Your Own, in DK Bayou colorway, 440 yds Fingering Weight 100% Merino
Needles: 2 16-inch Addi Turbos in US 1 (2.5 mm)
Gauge: 8.5 sts/inch in st st
Recipient: Myself, because I’m greedy!
Process Dates: January 30th - February 13th, 2006
Notes: This pair of socks was an entirely new experience for me. I knit them on 2 circulars from the toe up. That meant learning a new cast-on (or two, I tried the provisional cast-on with a short row toe and then opted for the Turkish cast-on), making short row heels, and learning a new bind off technique (sewn bind-off). That said, this was one of the fastest pair of sock-weight socks I’ve knit despite two major frogging sessions between the pair (one session per sock). The gauge is a bit looser than I tend to usually use so I was using a smaller number of sts than my previous sock-weight socks so I’m not quite ready to conceed that socks soar on two circulars. Though I did like 2-circs much, much better than magic loop and may end up being a convert. We’ll see how I feel using them for top down varieties…
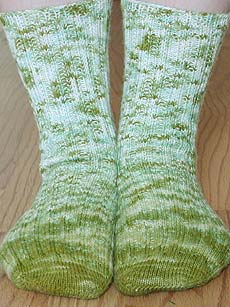
I wore the socks all day yesterday and have had no problems of the sock twisting on my foot like I feared would happen with the short-row heels. I did do one more set of wraps on the second heel to narrow it a bit and that did help get rid of the “ears” my heel had with the first sock. But I’m still not sure I’m a fan of the short row heels. I really don’t like that the sides of the heel don’t match (I know, how very knit picky of me) and despite picking up extra stiches at the rejoin with the rest of the stiches I had holes to patch upon completion. The short row heel will be the major deterent for my knitting more socks tow-up. I won’t say I’ll never do it that way, but I’ll probably think pretty hard before choosing to do that again despite my success with the Turkish cast-on and the reverse wedge toe. I do have some yarn from DH that I’ll do toe up so he gets the maximum leg length possible as I know that he likes long legs on his socks and I’d rather not play a guessing game.
12/14/2005
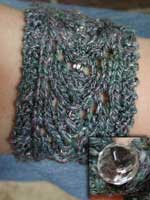
*Finally* I can share this dyeing experiment that took place during dyeing week in late November…
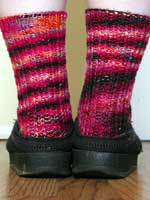
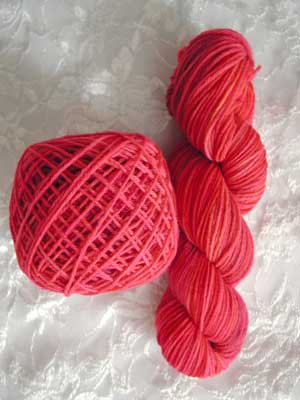
This yarn was dyed for fellow SnB gal, Amanda. Her birthday is on Friday, so I brought this yarn to her on Monday night at SnB. It is also dyed with Wilton food coloring like the other yarns I dyed that week, but this one got a special treatment as well that will result in 8 or 9 *matching* stripes per sock, so kind of thick stripes.
How did I do this you ask? Well, let me tell you…
I used one skein of KnitPicks Color Your Own Sock Yarn and the 4 main red/pink colors of Wilton’s food coloring. You can use any colors you want, though I suggest when you start to use analogous colors (colors that appear next to each other on the color wheel) or different shades of the same color family because it isn’t an exact science and some bleeding of colors can occur, especially the first time you try it.
1. Take the hank of yarn and wind it into a center pull ball.
2. Take the center pull ball and with both ends together, wind it into a doubled center pull ball. Clip the loop so you now have the skein split in half.
3. With your swift at it’s widest (~2 yd circumference), wind the double yarn onto the swift between 10 and 15 rotations. I tie a little bit of scrap to one support of the swift so I can more easily count the rotations. Then, tie this round of yarn in 4-5 spots. It may seem excessive, but it is *very* helpful to the process. Just be sure the ties are loose enough that the dye will still penetrate the yarn.
4. Repeat step 3 until all the yarn is used, tying the most recent group of rotations together and making sure not to get any other rotations tied in with it by accident. This will result in roughly 20-30 yd lengths of yarn for each skein of sock yarn in each section.
5. When all the yarn is hanked and tied into these mini 20-30 yd hanks, figure eight tie very loosely all the groups together with one large tie.
6. Soak yarn for a couple of hours in a strong vinegar/water solution.
7. Prepare your dyes to the strength you desire and put in large squirt bottles (I used ketchup bottles from the dollar store). Since I was using food coloring I mixed it with a strong vinegar/water solution.
8. Prep your dying space with protective newspapers and such, then lay down a run of plastic wrap long enough to easily incase the length of your hank.
9. Lay down the first mini-hanked section, apply the desired dye, wrap in saran wrap and move slightly to the side.
10. Lay down another sheet of plastic wrap and repeat step 9. Repeat this until the entire hank of yarn has been dyed.
11. I had a few sections that weren’t as well contained in their plastic wrap so I then wrapped the whole darn thing in plastic wrap again.
12. Place in a wire mesh strainer (dedicated to dyeing) over boiling water and steam for at least 45 minutes. If you are using a hard to set color like red, you might consider steaming for up to 2 hours. Be sure to flip your wrapped up yarn over a couple of times during the steaming process to ensure that all areas get plenty of direct steam heat.
13. Let cool before rinsing. This can aid in exhausting the dye in some cases.
14. Rinse.
15. Let dry.
16. Now, you need to reskein it into two separate skeins. It’s a piddly process because in winding the doubled center pull ball and putting it on the swift, the two strand of yarn have twisted around each other. So, I recommend making two center pull balls by hand as you pull the yarn off the swift. This way you can easily untwist the two strand of yarn as needed easily. I used two poor man’s nostepinnes (empty toilet paper tube and an empty paper towel tube) in this case. You can hook one strand up to a ball winder, but I personally found it easier to just have the two handmade balls in my lap.
17. You may keep them in these center pull balls. If you used a ball winder or nostepinne there shouldn’t be any problem with storing them long term in the ball form. If you did not have the open space for the ball to expand into you may loose elasticity in your yarn and you should then use your swift to put it into skeins again for storage. You might want to flag the matching ends of each skein if it isn’t obvious which ends match.
Now, with the red, I of course had trouble with the color setting, but I had steamed for a solid two hours. So, I unwrapped it and put it into the water and set it further in simmering water. This caused some bleeding of the different reds together, so the striping is subtle, but more noticeable than I thought when I first removed it from its bath. Also, because I tried rinsing for a while before putting it in for another bath it made the sock much more pink than I was originally intending, but I actually quite like it.
I decided to name it strawberry trifle because I figure the thicker stripes in the socks will look like the layers of a trifle and I thought the color was quite reminiscent of strawberry flavored things (like DH’s liqueur etc.).
When I was making the center pull balls of this yarn the one on the paper towel tube worked out much better for me (look at it, it’s the one still in a ball up there). I think that was because I have more room to hold onto so the movements could be smoother, which then resulted in a much more uniform ball of yarn. It makes me want a nostepinne or two :-)
I’ll try talk Amanda into letting me blog the completed socks whenever she decides to knit them up so you can see the truly final result of this dyeing experiment.
11/22/2005
Yep, more dyeing today. I promise at least one non-dyeing post this week, probably two, so if you aren’t into dyeing hold tight, okay? For those of you interested in dyeing, want a closer look?
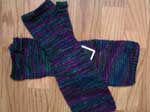
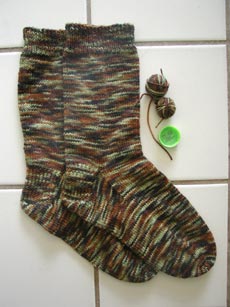
This one took a lot of piddling, but I think it will be worth it when I have a pair of completed socks. Casting on for those will have to wait for some time yet. If you look at the yarn in another form, it might be clearer what is going on in this yarn…

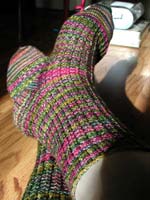
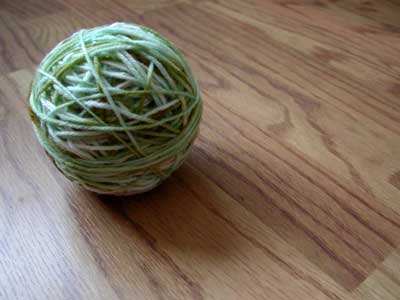
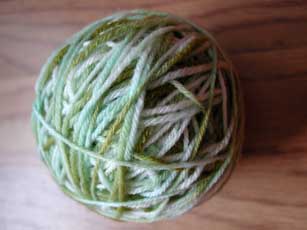
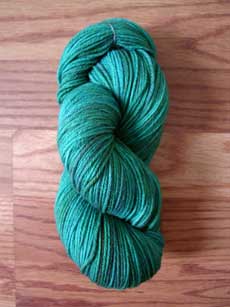
If you look at the image on the right there you might notice that it is mostly that brown-green at the bottom of the photo, but as you move up the photo the yarn becomes mostly aqua and cream with just touches of the brown-green. Well, I wanted to be able to have as close to matching socks as possible. So, I took the original hank of yarn and wound it into a center pull ball. Then, I took that center pull ball and wound it into a double thickness center pull ball. This essentially split the skein into two equal half skeins, but they are in a center pull ball still. Then, I soaked the ball in water and vinegar overnight wanting to make sure it got all the way to the center of the ball. I dyed it with Wilton’s Moss Green. So, the outside of the ball took up the color nearly evenly, but then it broke and took up less dye the farther into the ball you go. When the bath was exhausted I rinsed the ball a couple times and then pressed as much water out of it as possible and hanked it so I could rinse it better and so it could dry better. Then, I took that hank and split it back into single strands, but made two different balls (one hand made and one on the ball winder so I could untwist the strands without too much trouble). This seperation of the doubled yarn into single again was a looooong progress. I watched most of Say Anything while doing it.
That said, I think the work was worth it. The socks should have a semi-ombre look, but with varigation going from mostly the brown-green with more and more spots of aqua and cream showing up. I’m calling it Bayou. In showing it off at SnB and talking with Ashley last night I think it might be a great excuse to try my hand at toe-up socks so I can get the green at the toe and get lighter and lighter yarn as I go up the leg. But, as I mentioned before, it’ll be a while.
I have one more hank to dye (for now, LOL!) and I’m thinking I may repeat this process with the Wilton’s black as I understand that one breaks into some really fun colors.
I *did* finally get to SnB last night. I’ve not been doing well at being there this month. And, it seems the universe is in trouble should Snow and I both get to the same SnB gathering this month. I guess next Monday is her turn. Last night was just three of us long time die hards, but it was kind of a nice break, though I did definitely miss Snow and Amanda as I haven’t seen them since very early in the month. But, now that I actually got to go to SnB I feel like my week is sooooo much better than the past week’s when I haven’t made it. It’s probably a lot about getting out of the house and having non-writing centered conversations. Oh, but I’m soooo much happier today than this time last week! Thanks guys!
11/21/2005
I’ve been playing with dyeing over the last several days. I’ve restricted myself to Wilton’s Food Coloring though. Partially because I have this *need* for every color offered whenever I jump into a new medium and it’s cheaper to do that with food coloring and partially because we’re closing in on the holiday season so spending for myself needs to decrease.
I’m unable to show off all the dyeing because some of it is still drying and others of it is even still in the rinsing stage. So, I’m declaring this week Dyeing Week on the blog :-) The posts won’t all be dyeing posts but I’m anticipating another one or two this week. That or course means lots of pictures and colors which isn’t a bad thing around here seeing as most leaves and color are rapidly disappearing, leaving us with the usual browns.
First up, some dyeing I did on Thursday night while DH was at his write-in and then the midnight showing of HPGOF. I present Greens!
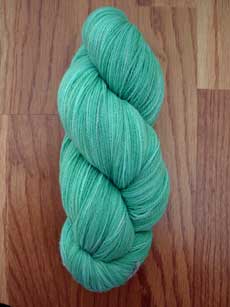
I put a skein of laceweight and a skein of sock weight into the dye bath together. Since I had no prior experience to know how much food coloring to add, I just kept dipping my little disposable Ziplock container into the bath, mixing some more food coloring in and then pouring that back into the pot. I’d let that exhaust and I’d repeat the process if I wanted a deeper color. I pulled the laceweight sooner than the sock yarn. The laceweight contains only teal and juniper green. I think it turned out great. There is a bit of subtle varigation for interest, but not so much that it would detract from intricate lace patterns. Of course I would need to get over my fear of lace shawls for this to ever be tested in practice, but that is a theory anyway :-)
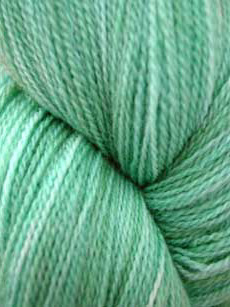
With the sock yarn I got a little more daring and added in some additional colors. The sock yarn is mostly the teal and juniper green like the lace weight just more of it, but in later dye baths I added some royal blue and some moss green to the mix as well. I was aiming for a bit more blue to the sock yarn so it might go back in for another bath of some royal blue. But, then again it is kind of growing on me as well. Another difference for the sock yarn — when I added the additional dyes I poured it directly onto the yarn resulting in a bit more variation in color on the yarn. Initially I had been using tongs to kind of hold the yarn to one side and adding the dye and mixing it in a bit and avoid a direct hit on the yarn as much as possible.
I am very pleased with both of these yarns! I got a bit more experimental with the next two I’ll be sharing later in the week. I tried some unconventional ways of dyeing them or preparing the yarn before dyeing them to be a bit more specific. I can’t wait for them to dry enough to get some good photos to share of those.
Now, back to the stove, though not for dyeing. I’m making cheese today. Ost kaka cheese that we’l freeze so it’s ready for the holiday season at some point. Our regular milk delivery day is now Thursdays, but with Thanksgiving this week it meant we get the milk delivered today. And, with all the writing DH still didn’t get any cheese made from last week’s delivery. So, I’m doing the Ost Kaka cheese and am actually kind of excited to be doing it. Ever since I show DH how to make Ost Kaka (which is what started him on the cheese making kick) I haven’t gotten to make it myself. So, it’ll be a nice change of pace for me to do it myself. It’ll almost be like being home for the holidays which I haven’t been since 1999.